How To Create A Pearl Chain In Photoshop [Easy Photoshop Tutorial]


GinAngieLa.com independently selects and reviews products & services. When you purchase through links on our site, we may earn a commission, at no extra cost to you. Learn more.

Many digital artists and illustrators like to use pearls and chains in their creations. But how to create a pearl chain in Photoshop? Well, its actually pretty easy and straightforward. In this tutorial, I show you how you can make a chain in Photoshop in five quick steps. Lets get into it!

How to create a pearl chain in Photoshop

Many artists like to use pearls as accessories and props in their photographs and digital creations. While it is no problem to find premade pearls that you can add to your image, it is much harder to find an entire pearl chain that meets your specific requirements…

Fortunately, it is pretty easy to create a pearl chain in Photoshop! 

In this quick & easy Photoshop tutorial, I’ll be showing you step-by-step how you can make shiny pearls and chains at just a couple of clicks. So here we go!

How do you make a chain in Photoshop?

To create a pearl chain in Photoshop, you'll need to follow these five easy steps:

    Add a header to begin generating the table of contents

    Here's how to create a Pearl Chain in #Photoshop in 5 EASY steps!

    Can you make pearl chains in Photoshop?

    Yes, you can absolutely. And it’s not even as hard as you might think. I love to work with pearls, especially in my surreal creations. I feel they are some great props that can add a soft, feminine touch to an image. But sometimes I also use them as a major element of the composition, such as in ‘oblivion.‘.

    In my recent work ‘Dearborn‘, I created all the long pearl chains hanging from the antlers in Photoshop – at just a couple of clicks with the mouse. It’s really easy and doesn’t take long. And in this tutorial, I’ll show you how to do it – step by step! 

    If you don’t have Photoshop yet, you can start a free 7-day Photoshop trial here. And if you are a student or a teacher, you can go ahead and claim your 60% Photoshop discount now.

    Dearborn‘ shows an example of a pearl chain created in Photoshop.
    oblivion.‘ is another work where I used a whole lot of pearl chains.
    → View the Making of ‘oblivion.’

    …and there’s still a little goodie waiting for you! I have uploaded the Photoshop Layer Styles that we are going to use in this tutorial to the Freebie Library. You can go there and download them for FREE

    The package includes 3 shiny pearl layer styles as well as the PSD file with three pearl chains that you can altogether customize to your liking.

    But now, without further ado, let’s get started with this tutorial on how to create a pearl chain in Photoshop!

    Easy Step-by-Step Photoshop Tutorial

    How to create a pearl chain in Photoshop

    STEP 1: Create a new layer in Photoshop

    If you haven’t yet, then first of all create a new file. Open Photoshop and click on File > New in the top menu. Enter the desired width and height, and the resolution (standard is 72 pixels/inch).

    Now you can create a new layer by clicking on Layer > New > Layer… in the top menu. Alternatively, you can also click on the ‘Create a new layer’ icon at the bottom of the layers panel.

    Create a new layer in Photoshop.
    Create a new layer in Photoshop.

    STEP 2: Use the Ellipse Tool to create a chain-like shape

    Next, go ahead and select the Ellipse Tool from Tool Bar on the left.

    You might not directly see the Ellipse Tool on the Tool Bar. By default, the Rectangle Tool might be visible. If that’s the case, simply right-click on the little downward arrow and select the Ellipse Tool from the drop-down menu.

    Select the Ellipse Tool from Tool Bar.
    Select the Ellipse Tool from Tool Bar.

    Once you have selected the Ellipse Tool, move the cursor across the canvas. You will see a round shape that you can easily adjust in width, height and form by moving the cursor accordingly.

    Make sure that ‘Shape’ is selected for tool mode in the top menu.

    Make sure that ‘Shape’ is selected for tool mode in the top menu.
    Make sure that ‘Shape’ is selected for tool mode in the top menu.

    Pro Tip: If you want to create a perfectly round circle, hold the Shift key while moving the cursor across the canvas.

    Hold the Shift key to create a perfectly round circle.
    Hold the Shift key to create a perfectly round circle.

    You can always readjust the look of the circle by transforming it accordingly without losing any quality. The shape is a vector that you can scale up and down as many times as you wish without any quality loss.

    In order to scale the shape, go to Edit > Free Transform (or Edit > Transform > Scale) in the top menu. Optionally, you can also use the keyboard shortcut CMD + T on a Mac or CTRL + T on a Windows PC.

    You can scale the vector shape any time without losing any quality.
    You can scale the vector shape any time without losing any quality.

    STEP 3: Customize the Shape settings

    Now that you have adjusted the shape that you want to use to create a pearl chain in Photoshop, it’s time to customize the Shape settings.

    Most importantly, make sure that you have selected ‘No Fill’ (the icon with the diagonal red line) for Shape fill type in the top menu.

    Make sure that you have selected ‘No Fill’ for Shape fill type in the top menu.
    Make sure that you have selected ‘No Fill’ for Shape fill type in the top menu.

    For ‘Stroke’, you can pre-select the color that you want to use for the pearls. However, you can always change the color later on using ‘Color Overlay’ in the Layer Styles section. (I’ll show you how in this tutorial.)

    For ‘Stroke’, you can pre-select the color that you want to use for the pearls in your chain.
    For ‘Stroke’, you can pre-select the color that you want to use for the pearls in your chain.

    Now we are coming to the part where we are actually creating the pearl chain in Photoshop! For that purpose, click on ‘Set shape stroke type’ in the top menu bar. That’s the little icon with a line and a downward arrow right to the selected Fill color.

    Once you have clicked on the icon, you will see a selection of stroke types. Click on the dotted line at the bottom. You will notice that the solid line of your circle transforms into little dots that will eventually form the pearl chain.

    Select a dotted line for stroke type to create a pearl chain in Photoshop.
    Select a dotted line for stroke type to create a pearl chain in Photoshop.

    You can adjust the size of the dots by moving the slider that will appear when you click on the downward arrow in the ‘Set shape stroke width’ icon. Move the slider up or down to increase or decrease the size of the ‘pearls’.

    Move the slider up or down to increase or decrease the size of the ‘pearls’.
    Move the slider up or down to increase or decrease the size of the ‘pearls’.

    When you have found a size that you like, you can go ahead and adjust the gap between the pearls.

    To do so, click again on ‘Shape stroke type’ (now the little dotted line that you have previously selected in the top menu). In the drop-down menu, click on ‘More Options’ at the very bottom. A pop-up window will open and you can enter a number for the Gap width. You can choose whole numbers or decimals, such as 2,5. Once you’ve entered a value, you will see your pearl chain change accordingly on the canvas.

    Make sure that Dash in the first field is set to 0.

    You can adjust the gap between the pearls by entering a number for Gap width.
    You can adjust the gap between the pearls by entering a number for Gap width.

    STEP 4: Apply Layer Styles

    In step no. 4, we are going to transform the flat dots into beautiful looking pearls. Therefore, we will need to apply a couple of layer styles in Photoshop.

    1. Bevel & Emboss

    The first style we are going to use is the Bevel & Emboss style. To do so, select the layer with the dotted line on the Layers Panel and click on the little ‘fx’ icon at the bottom of the panel. From the list that pops up, select Bevel & Emboss. This will bring you to the Layer Style Dialog Box.

    Does the Photoshop Layer Style Dialog Box still look like a maze to you?

    The Layer Style Dialog Box isn't as complicated as it may seem at first glance. To get the nuts and bolts of it, you can learn all the Basics of the Layer Style Dialog Box here. For a complete overview, check out the full  Photoshop Layer Styles Tutorial.

    With Bevel & Emboss selected on the left, you can go ahead and adjust the settings to make the dots look like actual pearls.

    Important: Please keep in mind that the Bevel & Emboss settings to achieve a certain effect always depend on the size of your pearls and the size of your image. So the settings I’m using below as an example are just a baseline. You might have to tweak the numbers a bit to obtain the same results.

    Bevel & Emboss allows you to make the dots look like actual pearls.
    Bevel & Emboss allows you to make the dots look like actual pearls.

    First of all, make sure that ‘Inner Bevel’ is selected under Style at the very top. Then you should have Technique set to ‘Smooth’, Highlight Mode set to ‘Screen’ and Shadow Mode set to ‘Multiply’.

    When you have everything set up that way, you can see some highlights and shadows add a certain shape to the dots.

    Not sure what ‘Screen’ and ‘Multiply’ actually is?

    No problem! You can learn everything about Blending Modes in Photoshop here. Also, I have a FREE Blend Modes Cheat Sheet for you in the Freebie Library. Simply download it and print it out so you always have the stuff handy!

    Free Download: Get Your Photoshop Blend Modes Cheat Sheet –
    Subscribe to get access to the Freebie Library and download your Free Photoshop Blend Modes Cheat Sheet with altogether 22 Pages Full Of Information!

    So far so good. But how do you make the pearls shine in Photoshop?

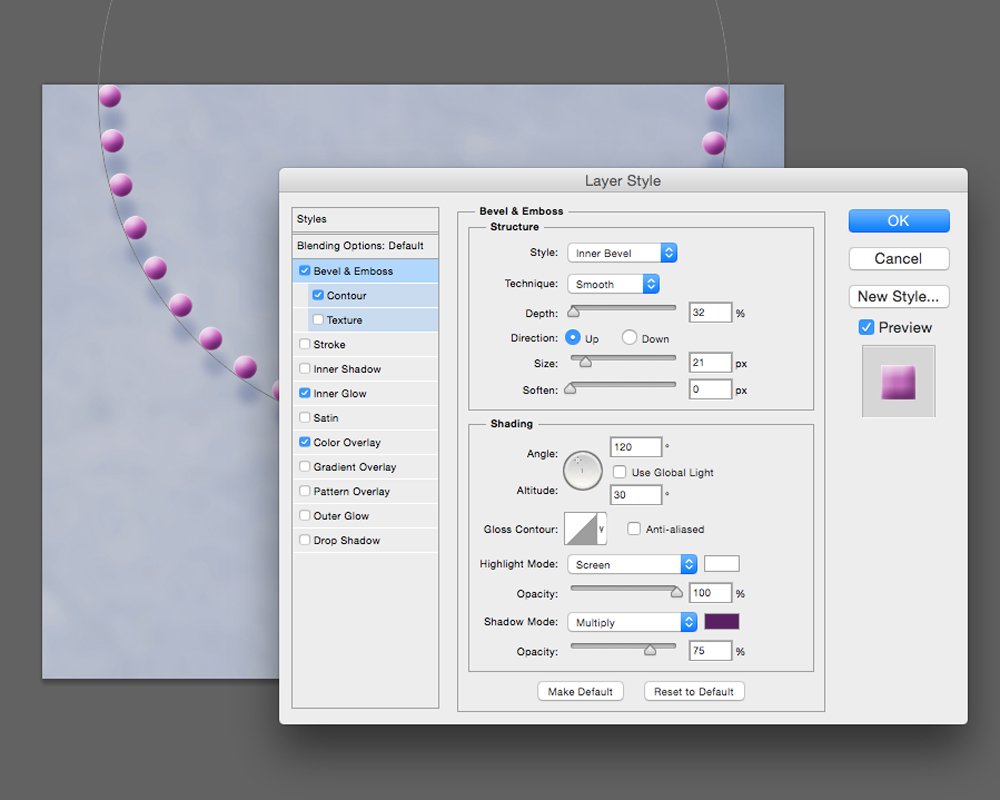
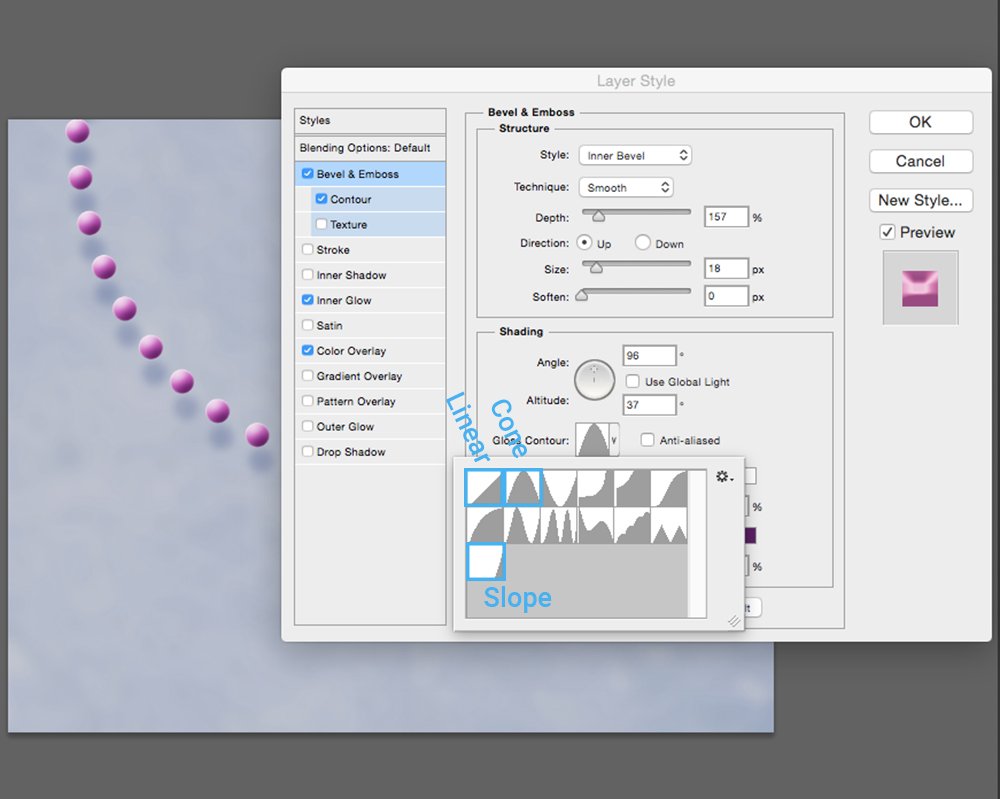
    Well, it’s pretty easy. Just play around with the Depth slider to adjust the look of the highlights. Usually, you will keep the slider in the lower end to not make the highlights appear too pointed.

    Direction lets you determine whether the source of light comes from the top or from the bottom. Choose what fits your composition.

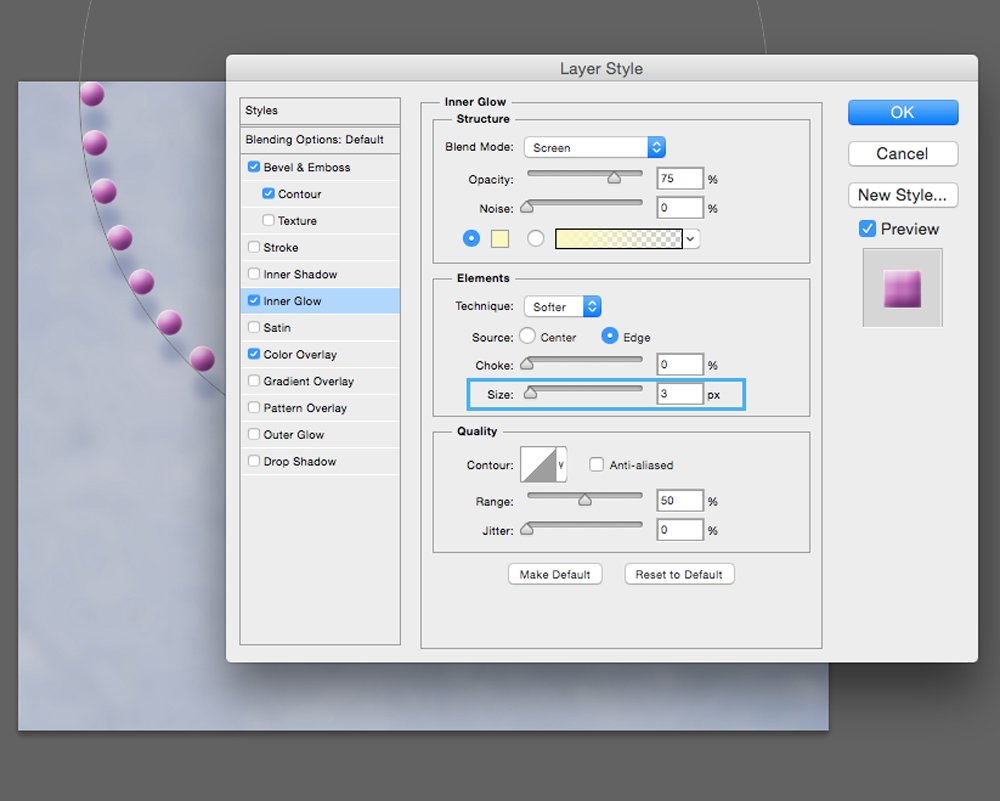
    Size lets you again adjust the look of the highlights. Fiddle around a bit with the Size slider to see how your pearls look best.

    The Soften slider basically allows you to blur the highlights.

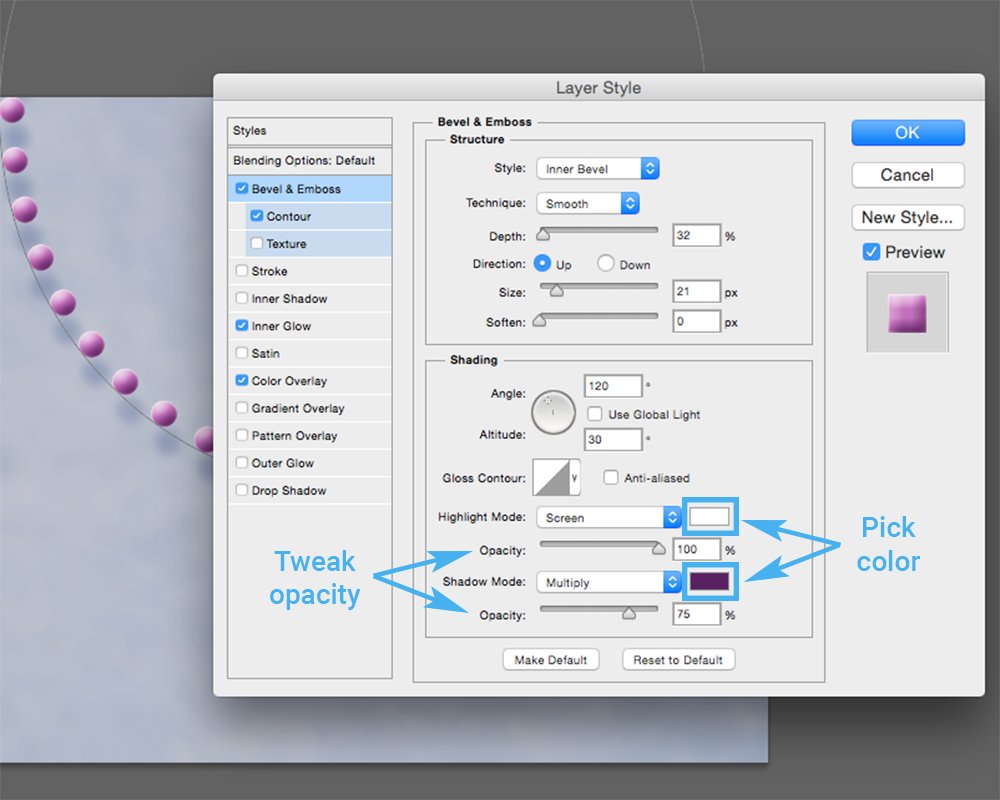
    Two very important settings are Angle and Altitude in the Shading section. You can either type in degree numbers or move around the crosshair cursor within the circle. This allows you to adjust the size and position of the highlights. Depending on where you place the crosshair cursor, the dots will look like pearls or more like sequins.

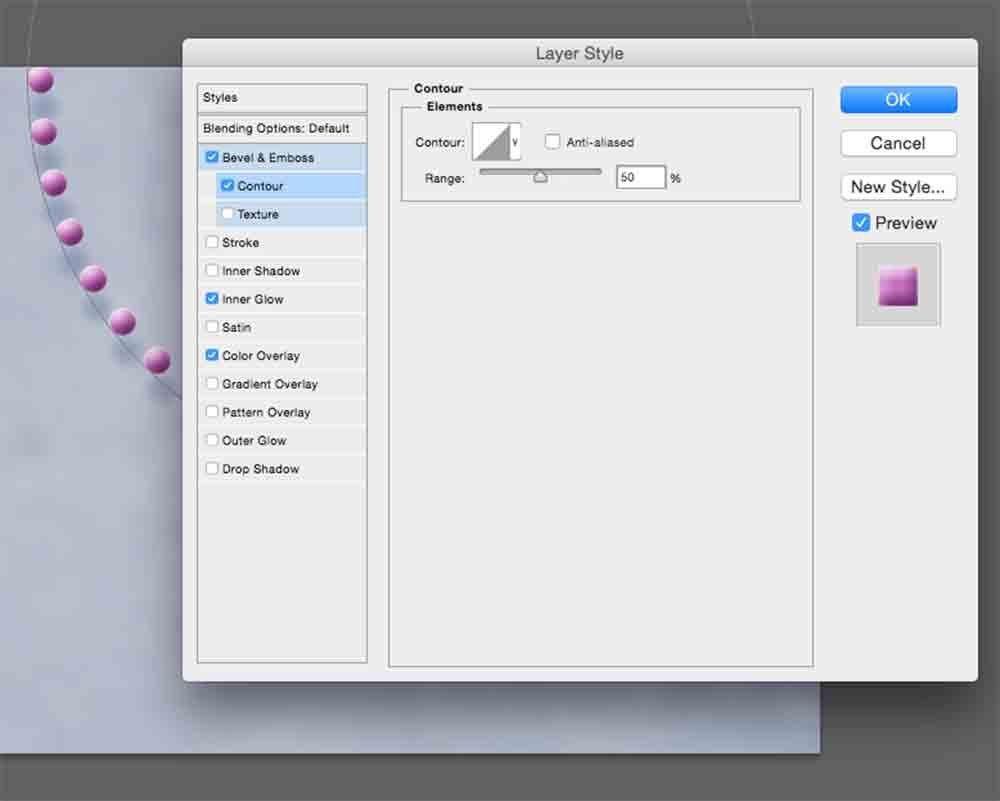
    The Gloss Contour settings let you fine-tune the look of your pearls. Depending on what contour you choose, the highlight will be more in the middle or at the edge of the pearls. Just click through the different contours to get an idea. Contours that tend to look pretty good for pearls are Linear, Cone and Slope.

    The Gloss Contour settings let you fine-tune the look of your pearls.
    The Gloss Contour settings let you fine-tune the look of your pearls.

    As an example, I have used those three different Gloss Contours in the sample image below. From top to bottom: Slope contour, Cone contour, Linear contour. 

    Depending on the contour you choose, you can create a pearl chain in Photoshop with different highlights.
    Depending on the contour you choose, you can create a pearl chain in Photoshop with different highlights.

    Lastly, you can change color and intensity of the Highlight and Shadow Mode. To modify the color, simply click on the little color swatch right to the mode and choose a color of your liking. 

    To reduce or increase the intensity of the highlights or shadows, move the Opacity slider up or down. 

    You can change color and intensity of the Highlight and Shadow Mode.
    You can change color and intensity of the Highlight and Shadow Mode.

    One final setting we are going to make under Bevel & Emboss is adjusting the Contour. To do so, tick the Contour checkbox on the left (just below Bevel & Emboss) and make sure the Contour tab is selected. 

    After that, you can adjust the Range of the Contour by moving the slider left or right. Choose a percentage value that works for your specific image. For my image, 50% turned out to look best.

    Adjust the Range of the Contour by moving the slider left or right.
    Adjust the Range of the Contour by moving the slider left or right.

    So far so good. You’ve already accomplished the major steps of creating a pearl chain in Photoshop. Congratulations! Now we are coming to the fine-tuning…

    2. Inner Glow

    Adding an Inner Glow is just the cherry on the cake. It’s not absolutely necessary, but it is a nice little extra because Inner Glow adds a shiny rim around the pearls. So let’s go ahead and activate the Inner Glow style.

    I didn’t make a lot of changes to the default settings. The only thing I changed is the Size.

    The Inner Glow style adds a shiny rim around the pearls.
    The Inner Glow style adds a shiny rim around the pearls.
    3. Color Overlay (optional)

    As I promised you above, I’m going to show you a quick method to change the color of the pearls. Regardless of what color you originally picked for the Stroke color of the Ellipse Tool, you can always modify it in the Layer Style Dialog Box

    Simply select the Color Overlay tab, click on the color swatch right to Blend Mode (red by default), and pick a color of your choice using the color picker that will pop up. It’s that simple!

    Color Overlay allows you to change the color of the pearls in the Layer Style Dialog Box.
    Color Overlay allows you to change the color of the pearls in the Layer Style Dialog Box.

    STEP 5: Create the chain string

    Creating the string is super-easy. First off, you’ll need to duplicate the layer containing the ellipse shape. Simply right-click on the layer and select Duplicate Layer from the pop-up menu. Alternatively, you can also press CMD + J on a Mac or CTRL + J on a PC. 

    Now, with the the Ellipse Tool selected on the Tool Bar, go back to the top menu and set the shape stroke type back to a solid line. Decrease the thickness using the shape stroke width slider so the string looks adequate in relation to the size of your pearls.

    All that remains to do now is scale down the ellipse shape a bit so it is positioned at the center of the pearls. 

    Creating the string is super-easy. All you need to do is duplicate the ellipse shape and adjust stroke type and width.
    Creating the string is super-easy. All you need to do is duplicate the ellipse shape and adjust stroke type and width.

    And that was it. You’ve just created a pearl chain in Photoshop!

    Free Download: Get the Photoshop Pearl Layer Styles –
    Subscribe to get access to the Freebie Library and download the Pearl Chain Layer Styles from this tutorial as ASL layer styles file and PSD Photoshop file. It’s all free and customizable to your personal needs!

    ∗∗∗

    I hope that this tutorial on how to create a pearl chain in Photoshop was helpful. If you found any value in it, please feel free to share it with other artists so they can also learn from it!

    If you are using anything of what I’ve showed you in this post, don’t forget to tag me on Instagram @ginangiela, or post a link here in the comments. I’d love to see your creations! Make sure to sign up for my email list below so you don’t miss out on new Photoshop tutorials, perks for subscribers and other cool stuff. ♥

    how to create a pearl chain in photoshop
    how to create a pearl chain in photoshop
    how to create a pearl chain in photoshop
    how to create a pearl chain in photoshop
    how to create a pearl chain in photoshop
    AngieG. – The Person behind the Pictures
    HI Y'ALL!  
    My name is Angie and I’m a self-taught digital artist. On this blog, I am sharing my experience and educational resources to help you develop your editing skills. My desire is to help you get to grips with Photoshop without needing expensive education or years of experience. To succeed, all you need is passion and the desire to learn!
    LET'S CONNECT:
    SHARE THIS POST:

    We ♥ comments and appreciate the time that readers spend to share ideas and give feedback. However, all comments are manually moderated and those deemed to be spam or solely promotional will be deleted.