How To Make A Photo Warmer In Photoshop – 5 EASY WAYS


GinAngieLa.com independently selects and reviews products & services. When you purchase through links on our site, we may earn a commission, at no extra cost to you. Learn more.

Knowing how to make a photo warmer in Photoshop is essential. Because changing the temperature of an image changes the entire feel of that picture. This tutorial will show you 5 QUICK & EASY TECHNIQUES for how to create warm tones in Photoshop. Photo filters, color filters, and color balance will not only allow you to adjust the temperature, but also to warm skin tones in Photoshop.

How to create warm tones in Photoshop?

Knowing how to create warm tones in Photoshop is one of the essentials for every photographer and digital artist. Changing the temperature of an image is just a minor intervention. But it can create a completely different look and feel. Warmer photos often look more pleasant and soft.

In this tutorial, I’ll guide you through 5 super-simple techniques that you can use to make a photo warmer in Photoshop. These techniques will allow you to adjust the temperature of an image at just a few clicks of the mouse – but very effectively. 

You can use any of these techniques individually or combine them to achieve exactly the result you desire!

Apart from the usual photo filter that is commonly used to warm up photos, I’ll also be showing you how you can use color balance, selective color filters, color overlays, etc. to adjust the temperature and warm skin tones in Photoshop!

Ready to go? Let’s jump right into it!

How do you change the temperature of an image in Photoshop to make it look warmer?

These are 5 EASY TECHNIQUES to make a photo warmer in Photoshop:

    Add a header to begin generating the table of contents

    How to make a photo warmer in Photoshop – 5 EASY TECHNIQUES explained in detail

    TECHNIQUE 1: Add a Photo Filter Adjustment Layer

    The first technique to make a photo warmer in Photoshop is about adding a Warming Filter. This is probably the most commonly used method to adjust the temperature of an image. 

    Adding a Warming Filter can be done very easily by creating a new Photo Filter Adjustment Layer

    To create a new adjustment layer, go to the top bar menu and click on Layer > New Adjustment Layer. Then select the adjustment layer you need. In this case, it’s Photo Filter

    Adding a new adjustment layer via the top menu bar.
    Adding a new adjustment layer via the top menu bar.
    Want to know how to get the Copyright symbol © on a Photoshop tab?
    Adding a new adjustment layer via the Layers Panel.
    Adding a new adjustment layer via the Layers Panel.

    Another way to add an adjustment layer is by clicking on the little Create new fill or adjustment layer‘ icon at the bottom of your Layers Panel. 

    Then choose the desired adjustment layer from the menu. 

    Once you’ve added the Photo Filter Adjustment Layer, you’ll see the default Photoshop Warming Filter (85) applied to your photo. This is an orange kind of warming filter that does a great job for many images. 

    If you’re not happy with the preset effect, you can tweak the Density slider to increase or decrease the warming effect

    Just make sure to keep Preserve Luminosity checked because it delivers a more natural, glowing result. 

    Configuring the default Warming Filter.
    Configuring the default Warming Filter.

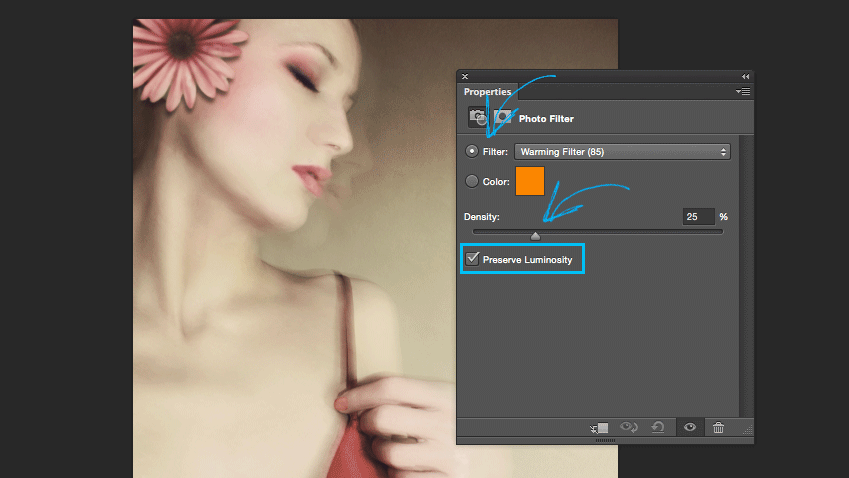
    If you don’t like the orange tone of the default Warming Filter (85), you can click on the Filter dropdown for a broader selection of photo filters. 

    There are altogether 3 Warming Filters that you can try, and another 4 pre-defined Red, Orange, Violet, and Magenta filters that you can also use to change the temperature of your image in Photoshop

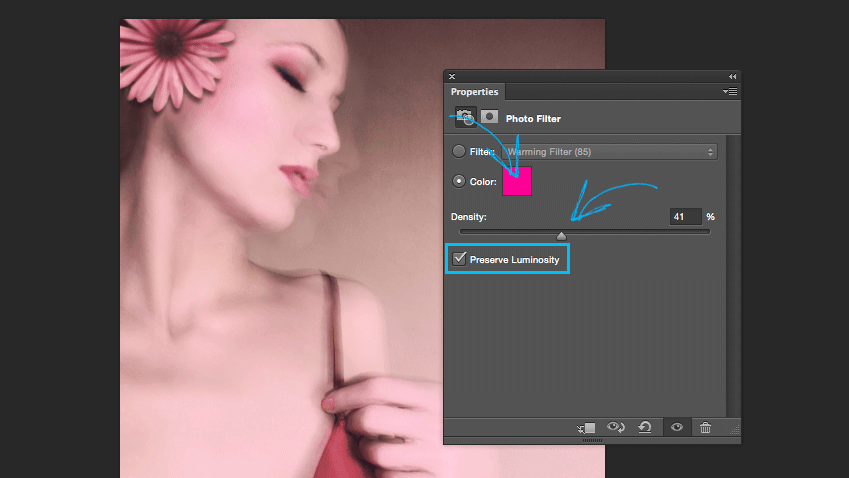
    If that’s still not enough, simply create your own photo filter! 😆 To do so, enable ‘Color‘, click on the color icon, and then select the color of your choice from Photoshop’s color wheel. 

    Again, you can tweak the Density to make things look the way you want them to be. 

    Alrighty, that was about it for the Photo Filter. Now let’s move on to the second technique for how to make a photo warmer in Photoshop!

    Creating a custom color warming photo filter.
    Creating a custom color warming photo filter.
    TECHNIQUE 2: Add a Color Balance Adjustment Layer

    Technique number 2 is about adding a Color Balance Adjustment Layer, which also gives you great options to adjust the temperature of your image. 

    To add a new Color Balance Adjustment Layer, just follow the steps described at the beginning of Technique 1. 

    Once your Color Balance Adjustment Layer is added, you’ll see three sliders that allow you to adjust the ‘Midtones‘ of your photo. 

    To make your photo warmer in Photoshop, move the sliders more towards the Red, Magenta, and Yellow tones.  

    Usually, it’s good to keep Preserve Luminosity ticked as well, because the result will look more pleasant. 

    Tweaking the Color Balance (Midtones) in Photoshop to achieve a warming effect.
    Tweaking the Color Balance (Midtones) in Photoshop to achieve a warming effect.

    Apart from adjusting the Midtones, the Color Balance Adjustment Layer also allows you to modify Highlights and Shadows

    Fine-tuning the Highlights is usually a great way to make the warm colors even more intense, and also to warm skin tones in Photoshop. Play around with the sliders to see what looks best for your photo.   

    Adjusting the Shadows is worth a try, if you’d like to get away brown tones in Photoshop. 

    Fine-tuning the Color Balance Highlights to warm skin tones in Photoshop.
    Fine-tuning the Color Balance Highlights to warm skin tones in Photoshop.
    TECHNIQUE 3: Add a Hue/Saturation Adjustment Layer

    Technique 3 is an equally great method to make a photo warmer in Photoshop that just requires you to move around a couple of sliders. 

    For this technique, we’re going to add a Hue/Saturation Adjustment Layer. Right in the Properties menu (with the Master selection active), you can move the Hue slider.  

    Move the slider up and down to see how the colors of your image are changing. Once you’ve found some warm tones that you like for your photo, you can try increasing the Saturation

    Creating warm tones in Photoshop by changing Hue and Saturation.
    Creating warm tones in Photoshop by changing Hue and Saturation.

    Another great thing about the Hue/Saturation Adjustment Layer is that it offers you the possibility to target certain colors directly. When clicking on the Master dropdown, you’ll see the six main colors. 

    Choose one of the main colors that you want to change to a warmer tone in your image.

    For the example below, I’ve selected the Yellows. I was looking for a way to get brown tones away in Photoshop – and this is a great method to do that! 

    With the Yellows selected, move the Hue slider up and down again and see how the yellowish and brownish tones in your image are changing. 

    Use the Saturation slider, to intensify the color. 

    Getting the yellow and brown tones warmer in Photoshop.
    Getting the yellow and brown tones warmer in Photoshop.
    TECHNIQUE 4: Add a Solid Color Adjustment Layer in Soft Light

    Technique 4 of our tutorial on how to make a photo warmer in Photoshop is a very quick and easy one!

    In this technique, we’re going to use a Solid Color Adjustment Layer to create warm tones in Photoshop. First of all, add the new adjustment layer and select a warm color of your liking.

    Next, switch the Blend Mode of the adjustment layer to Soft Light. If you think the effect is too strong, you can decrease the layer’s Opacity in the top bar of your layers panel.

    You can play around with the color once the Opacity is decreased to see what color matches your taste best. Also try to switch the Blend Mode to Overlay – this will create a slightly intenser warming effect for your photo!

    → TOP 6 Photoshop Blending Modes Explained

    Adjusting the temperature in Photoshop with a Solid Color Adjustment Layer in Soft Light.
    Adjusting the temperature in Photoshop with a Solid Color Adjustment Layer in Soft Light.
    TECHNIQUE 5: Add a Selective Color Adjustment Layer

    The last technique of our tutorial on how to make a photo warmer in Photoshop is actually the most versatile and powerful one! 

    Adding a Selective Color Adjustment Layer gives you the most options to change the temperature of your image by targeting all six main colors, plus black, gray, and white. 

    So let’s get into it! 

    First of all, select the color that you predominantly want to change from the Colors dropdown. For my image in the example, it’s again the Yellows

    Next, take out the cool tones by decreasing the amount of Cyans and Yellows and increasing the warm tones such as Magenta. Upping the Blacks will intensify the colors. 

    Make sure to have Relative selected at the bottom – it usually produces the better results!

    Starting to warm skin tones in Photoshop with the Yellow color selector.
    Starting to warm skin tones in Photoshop with the Yellow color selector.

    After that, you can move on to change other specific colors in your photo, such as Red, Blue, Magenta, or Green

    The principle is always the same: take down the amount of the cool tones and add more of the warm tones. 

    The red color selector usually warms skin tones well in Photoshop.
    The red color selector usually warms skin tones well in Photoshop.

    Tweaking the Whites on the Selective Color Adjustment Layer is a bit like modifying the Highlights on a Color Balance Adjustment Layer. It kind of balances the white tones and makes them appear more shiny and warm. 

    Just play around with the sliders to see what works well for your photo. 

    Tweaking the white balance in Photoshop for a warmer effect.
    Tweaking the white balance in Photoshop for a warmer effect.

    When it comes to the Neutrals, small changes produce great effects! Neutral tones are basically everywhere in a picture, that’s why slight changes have a big impact on the overall look of the image. 

    So use this option scarcely… Minimal adjustments of the Neutrals already create visibly warmer tones. 

    Adjusting the Neutrals minimally already creates visibly warmer tones.
    Adjusting the Neutrals minimally already creates visibly warmer tones.

    And that was it for this tutorial. You’ve just learned 5 techniques to make a photo warmer in Photoshop! 

    In this tutorial, we went from the rather cold looking little pic in the bottom right corner to the bigger version that feels much softer and warmer.

    I normally use a combination of 2 or more the above techniques to change the temperature of an image in Photoshop to exactly what I have in mind. 

    Feel free to check out my work ‘Why can’t you feel me?‘ and more photos from my Headshots Collection!

    ∗∗∗

    I hope that this tutorial on how to make a photo warmer in Photoshop was helpful. If you found any value in it, please feel free to share it with other artists so they can also learn from it!

    If you are using anything of what I’ve showed you in this post, don’t forget to tag me on Instagram @ginangiela, or post a link here in the comments. I’d love to see your creations! Make sure to sign up for my email list below so you don’t miss out on new Photoshop tutorials, perks for subscribers and other cool stuff. ♥

    5 EASY WAYS – How To Make A Photo Warmer In Photoshop
    5 EASY WAYS – How To Make A Photo Warmer In Photoshop
    5 EASY WAYS – How To Make A Photo Warmer In Photoshop
    5 EASY WAYS – How To Make A Photo Warmer In Photoshop
    AngieG. – The Person behind the Pictures
    HI Y'ALL!  
    My name is Angie and I’m a self-taught digital artist. On this blog, I am sharing my experience and educational resources to help you develop your editing skills. My desire is to help you get to grips with Photoshop without needing expensive education or years of experience. To succeed, all you need is passion and the desire to learn!
    LET'S CONNECT:
    SHARE THIS POST:

    We ♥ comments and appreciate the time that readers spend to share ideas and give feedback. However, all comments are manually moderated and those deemed to be spam or solely promotional will be deleted.