Why combine multiple photos into one Photoshop document?
There can be many reasons why you, as an artist, would like to combine multiple photos into one Photoshop document.
One reason may be that you want to show Work in Progress (WIP) shots of one of your artworks. Actually, WIPs are a proven way to attract exposure if you want to sell digital art on Pinterest. People generally tend to be curious about how pictures were created!
If you run your own blog, then you can put multiple photos on one page in Photoshop to illustrate your creative process. After all, you have as much space as you need on your own website. So it’s no problem if your Photoshop document gets very large in height or width…
…like the one right here that I’m going to show you how to make in this Photoshop tutorial!
Work in Progress of ‘Rose Red Supper‘ from my Surreal Stories Collection
Btw, it’s also a great idea to use a dynamic Before & After slider on your WordPress site to show your creative process.
You can also make a Before and After picture in Photoshop, for example to upload it to your Instagram. Instagram’s image dimensions don’t allow as much vertical space as Pinterest Pins. So it’s a good idea to go with a smaller size for IG.
If you like to get a bit more fancy, use a Before & After image with a Slider Effect. I have a FREE Photoshop Before & After Slider for you to download in the Freebie Library, so you don’t need to create it all from scratch. 🙂
But now without further ado, let’s get into the nitty-gritty of how to add multiple photos into one Photoshop document!
To put multiple photos on one page in Photoshop, these are the three steps you'll need to follow:
How to put multiple photos on one page in Photoshop
STEP 1: Open Photoshop's File Stack Loader
How to open multiple images as layers in Photoshop?
Instead of using the regular ‘Open‘ option, we’re going to use the File Stack Loader to open multiple images as layers in Photoshop.
You’ll find the File Stack Loader under the same menu item as the normal ‘Open‘ option. So simply go to the top menu bar and click on File. Then move all the way down to Scripts and select Load Files into Stack.
This will bring you to Photoshop’s ‘Load Layers‘ dialog box. The ‘Load Layers‘ function makes it super-easy to add multiple photos in one photo in Photoshop!
STEP 2: Select the images to load
Click on the Browse button to select those photos that you want to load into a new document.
Hold the Shift key to select multiple photos in a row. Hold the Command (CMD) key on a Mac or Control (CTRL) key on a PC to choose photos that are not in one row.
Once you’ve made your selection, click on the Open button.
That done, you should now see all the images that you want to load into one Photoshop document in the ‘Load Layers‘ dialog box.
If that’s the case, just click on the OK button on the top right!
You’ve now opened multiple images as layers in Photoshop and can see all the individual layers in your layers panel!
STEP 3: Increase the canvas size & arrange your photos
All that remains to do in Step 3 is to increase the canvas size and arrange the photos so all images are visible!
To enlarge the canvas size, you can use the Crop Tool from the Toolbar. Pull the crop grid into the direction where you want to make your canvas larger – vertical or horizontal.
Then select the layer of the first image that you want to move away from beyond the stack of layers.
Pick the Move Tool from the Toolbar and drag the image to where you want to have it. Use the Arrow keys on your keyboard to tweak its position.
Repeat the process until all the photos are arranged on the Photoshop page the way you want them to be.
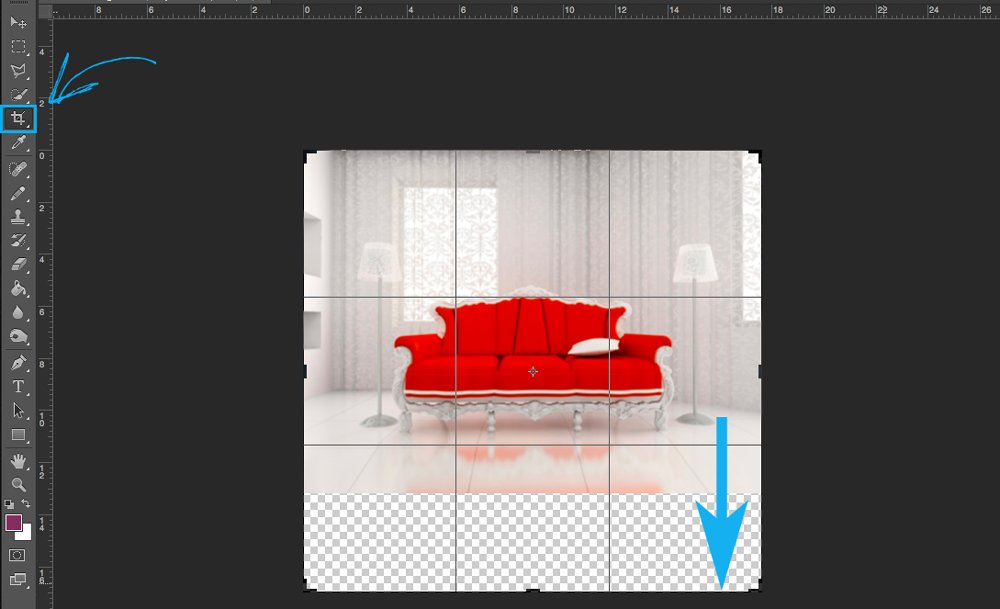
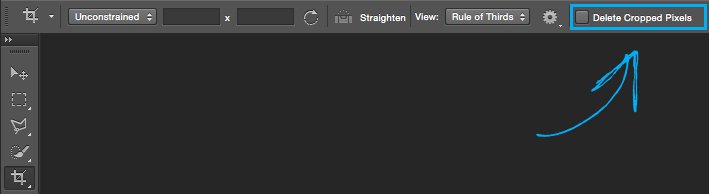
If you haven’t increased the size of your canvas enough to fit all photos on the same Photoshop page, you can use the Crop Tool again to make the canvas larger. Just make sure to uncheck ‘Delete Cropped Pixels’ in the top bar, so you don’t accidentally lose parts of your images!
If you want to add another picture onto your Photoshop page, you can simply go to File > Open in the top menu bar and add the image ‘old school’ – without using the File Stack Loader!
And here we are! You’ve just learned how to put multiple photos on one page in Photoshop!
∗∗∗
I hope that this tutorial on how to put multiple photos on one page in Photoshop was helpful. If you found any value in it, please feel free to share it with other artists so they can also learn from it!
If you are using anything of what I’ve showed you in this post, don’t forget to tag me on Instagram @ginangiela, or post a link here in the comments. I’d love to see your creations! Make sure to sign up for my email list below so you don’t miss out on new Photoshop tutorials, perks for subscribers and other cool stuff. ♥