Layer Style Dialog Box In Photoshop – Understanding The Basics


GinAngieLa.com independently selects and reviews products & services. When you purchase through links on our site, we may earn a commission, at no extra cost to you. Learn more.

The Layer Style Dialog Box in Photoshop is a powerful tool that gives you immense control over layer effects and blending options. But precisely because it’s so complex, the Layer Style dialog window can be hard to sift through. This Photoshop tutorial explains all the features of the Layer Style Dialog Box – one by one from top to bottom. By the time we wrap up this post, you will have caught on to styles panels, layer effects, advanced blending, and much more!

Layer Style Dialog Box in Photoshop

As you have probably seen in some of my previous posts about creating a steel effect, water bubbles, or realistic water drops, Photoshop’s layer styles are lots of fun to use!

There’s a total of 10 layer effects available that let you create a ton of cool things.

You can apply layer effects to almost anything that is on a layer: text, objects, images, vectors, etc. When you change the content of your layer, the layer effects automatically update and apply to the new content. Super-practical. 

Layer styles are non-destructive. You can always come back and re-edit them, as long as you save your document as a PSD file.

Download FREE Photoshop Layer Styles

… btw, there are some FREE Photoshop Layer Styles to download in the Freebie Library. So if you’re interested in text and other effects, feel free to head over there and check them out!

Table of Contents
    Add a header to begin generating the table of contents

    What are layer styles vs. layer effects in Photoshop?

    You’ll often hear the terms ‘layer styles’ and ‘layer effects’ used interchangeably, even though they don’t mean exactly the same thing.

    Layer effects are the individual effects themselves that you see listed on the left side in your Layer Style Dialog Box. So, a layer effect is, for example, Drop Shadow, Stroke, Bevel & Emboss, Outer Glow, and so on.

    A layer style, on the other hand, is a combination of two or more of the individual layer effects.

    Layer styles also include the Blending Modes that you can apply to a layer, along with Opacity and Fill settings.

    What are layer styles vs. layer effects in Photoshop?
    Layer styles vs. layer effects in Photoshop

    How do you add a layer style in Photoshop?

    Adding layer styles to your designs is super-easy. There are different ways to do so. 

    The first possibility is to go to the top menu bar, click on Layer > Layer Style, and select your preferred effect from the drop-down menu. 

    This will automatically bring up Photoshop’s Layer Style Dialog Box where you can adjust the effect and add more effects. 

    How do you add a layer style in Photoshop?
    Adding a Layer Style via the top menu bar.

    Where is the styles panel in Photoshop?

    You can choose different workspaces in Photoshop (Window > Workspace). 

    Depending on the workspace you’re using, you might find the Layer Styles Panel icon in Panels Bar on the right side. 

    It’s a filled square with two tiny cursive fx letters on top of it.  

    Where is the styles panel in Photoshop?
    The Layer Styles Panel icon in the Panels Bar.

    If you don’t see the Styles Panel icon yet, you can enable it by going to Window > Styles in the top menu bar.

    As soon as you’ve ticked Styles, the Styles Panel will pop up on your workspace. You can drag and drop it onto your Panels bar to keep it handy, or click on the two little right arrows at the top right to collapse the panel.

    Where is the layer style icon in Photoshop?

    The other way to add a layer style in Photoshop is by using the Layer Style Icon.

    The Layer Style icon is at the bottom of your Layers Panel

    The Layers Panel is the box that shows all the layers that you’re having in your current document.

    If you can’t see the Layers Panel, go to Window in the top menu bar and make sure that Layers is ticked.

    Just like the Styles Panel icon, the Layer Styles icon on the Layers Panel has the same little cursive fx letters.  

    Where is the layer style icon in Photoshop?

    A click on the Layer Styles icon will display a pop-up menu. Selecting any effect from the pop-up will also bring up the Layer Style dialog window. From there, you can edit your current effect and add more effects, if you wish.  

    Why are the Photoshop layer effects not showing?

    If the Layer Styles icon or the layer effects in the top menu bar are grayed out, it’s likely because you’re working on the background layer. 

    Photoshop doesn’t allow us to use layer styles on any layer that is locked, such as the background layer. 

    To unlock a layer, click on the little padlock icon on the far right-hand side of the layer, or make a copy of the layer. This should solve the problem. 

    How do you use layer styles in Photoshop?

    In this post, I’ll be specifically taking a look at the Layer Style Dialog Box in Photoshop, and how to use it.

    If you’d like to find out more about using layer styles in Photoshop, feel free to check out my Full Photoshop Layer Styles Tutorial for more.

    With that said, let’s jump straight into today’s post and let’s have a look at Photoshop’s Layer Style Dialog Box!

    Understanding the Layer Style Dialog Box in Photoshop

    To get a good grasp of how the Layer Style Dialog Box works, let’s look at the individual sections one by one, starting on the left-hand side. 

    1. LEFT SECTION of the Layer Style Dialog Box in Photoshop

    Above, you’ve already learned that a click on the Layer Style icon or selecting a layer effect from the top menu bar brings up the Layer Style Dialog Box

    Let’s say you want to add a Drop Shadow effect to your current layer, which is not locked. With the layer selected, click on the Layer Style icon at the bottom of your Layers Panel and choose Drop Shadow from the pop-up menu. 

    This will bring you directly to the Drop Shadow settings in the Layer Style dialog window where you can tweak the effect to your liking.  

    LEFT SECTION of the Layer Style Dialog Box in Photoshop
    The left section of the Layer Style Dialog Box includes the layer effects.

    In the left column of the Layer Style Dialog Box, you can select a check box to apply more effects. If you simply check the box, Photoshop applies the effect but doesn’t automatically open the effect’s settings. 

    If you want to change the default settings of an effect, make sure to click on the name of the effect to access its settings.

    You can see which effect you’re currently editing by looking at the name of the effect that always shows at the top center of the Layer Style Dialog Box. 

    At the very top of the left section, you’ll find the Default Blending Options, right above the list of layer effects. By clicking on ‘Blending Options: Default‘, you’ll be brought to a different set of settings. Those allow you to change the layer’s Blending Mode, Opacity, Fill, and other values. 

    We’ll be having a look at the GeneralAdvanced Blending options later on in this tutorial. But now let’s jump over to the center section!

    blending options
    'Blending Options: Default' lets you access General & Advanced Blending options.

    2. CENTER SECTION of the Layer Style Dialog Box in Photoshop

    Many of the ten layer effects have two sub-sections within the center section of the Layer Style Dialog Box. A few effects have three sub-sections, and some have only one. 

    The Drop Shadow effect, for example, comes with two sub-sections (Structure & Quality) that offer heaps of options to customize the effect to your personal liking. 

    Just play around a bit with all of the settings to find out how they work. It’s pretty fun to see how the appearance is changing as you move the sliders and try out different menu items.  

    CENTER SECTION of the Layer Style Dialog Box in Photoshop

    Blend Mode, Color, Gradient, and Opacity settings

    Since many of Photoshop’s layer effects naturally involve color, you’ll find Blend Mode, Color, Gradient and Opacity settings for them in the center section of the Layer Style Dialog Box

    By default, the Blend Mode of the Drop Shadow effect is set to Multiply, because this blending mode is particularly adequate to create dark shadows. To change the Blend Mode, simply click on the dropdown and choose another one. 

    The default color of the Drop Shadow is black. To choose another shade for your image, simply click on the color swatch next to Blend Mode. This will bring up Photoshop’s color picker where you can select a color from the color wheel or use the eyedropper tool. 

    Some effects come with a Gradient option. Choosing a gradient works just the same as choosing a color. Simply click on the Gradient swatch and select different colors using the color picker. 

    The Opacity slider lets you control the strength of the effect. To make the shadows appear less intense, move the slider down to the left. To bump them up, move the slider to the right. 

    Blend Mode, Color, Gradient, and Opacity settings
    The Opacity slider lets you control the strength of the effect.

    The 'Global Light' option

    One thing that is particularly important is the ‘Use Global Light‘ option. Apart from Drop Shadow, this option also comes with Bevel & Emboss and Inner Shadow. 

    use global light
    'Use Global Light' comes with three layer effects.

    As you might have noticed earlier, there’s also a Global Light option in the Layer drop-down menu. 

    Once you check ‘Use Global Light‘ in the Layer Style Dialog Box, Photoshop will apply the selected lighting angle to each layer effect that uses shading. 

    global light under layer drop-down menu
    There's also a Global Light option in the Layer drop-down menu.

    If you change the angle in one of the these effects or in the Layer menu, the new angle will be applied to all layers across the entire document.

    Besides Angle, which determines the angle of the lighting, there are three more settings to pay attention to: Distance, Spread, and Size.  

    Distance controls the offset distance for a shadow or satin effect. Spread lets you set the gradation of how the shadow fades toward the edges. Size specifies how far the shadow extends.

    The 'Make Default' and 'Reset to Default' settings

    At the very bottom of the center section, you’ll find two buttons: ‘Make Default‘ and ‘Reset to Default‘. 

    Photoshop’s layer effects come with certain default settings. Once you’ve modified these settings and found a great looking effect, you can make it the default effect by clicking on ‘Make Default‘. 

    Every time you select that effect again, it will now come with your modified default settings. If you don’t like your personal settings anymore, simply click on ‘Reset to Default‘ to revert back to the original look of the effect. 

    The 'Make Default' and 'Reset to Default' settings
    You can make a modified effect your default, or revert back to the original look of the effect.

    3. RIGHT SECTION of the Layer Style Dialog Box in Photoshop

    Let’s move on to the right section of the Layer Style Dialog Box

    The first two buttons are pretty self-explanatory… If you’re OK with the way your layer style looks, just hit the top button… 😉  If you find your layer style awful, just click Cancel

    The 'New Style' button

    The third button is way more interesting. Once you’ve configured a layer style that consists of one or more effects, you can save it to your Layer Styles Panel

    As you’ve probably seen in the screenshot above, my Styles Panel includes a couple of swatches that all represent different saved layer styles. If I click on any of the swatches, the style will be instantaneously applied to the active layer. This is a huge time saver, because some of my pre-saved styles include A LOT of complex effects…  

    RIGHT SECTION of the Layer Style Dialog Box in Photoshop
    The right section of the Layer Style Dialog Box.

    A click on the ‘New Style‘ button will bring up a small dialog window where you can enter a name for your style and select further options. 

    Obviously, you want to save the layer effects that you’ve just configured. So you want to keep ‘Include Layer Effects‘ checked. 

    Checking ‘Include Layer Blending Options‘ is important, if your layer style does not only include the layer effects themselves, but also a Blending Mode other than Normal, or reduced Opacity and Fill settings.

    As soon as you hit the OK button in the New Style window, your layer style is saved within Photoshop and will show as a swatch in your Styles Panel

    The thumbnails in the Layer Style Dialog Box and in the New Style window (see orange arrows) show you what your layer style swatch will look like in the Styles Panel

    saving a new layer style to the styles panel

    The 'Preview' checkbox

    Last but not least, there’s the Preview checkbox in the right section of Photoshop’s Layer Style Dialog Box

    When having Preview enabled, you see a live preview of your current effects on the canvas as you are editing them in the dialog box. 

    As soon as you uncheck Preview, you see your image as it was before, without the new layer style settings. This is super-practical for comparing whether the old or the new effect gives you the better result!

    preview checkbox
    The Preview option is practical for comparing whether the old or the new effect gives you the better result.

    Blending Options: General & Advanced Blending

    As I promised above, we’re going to come back to center section of the Blending Options

    A click on the first tab on the left, Blending Options: Default, will display the General and Advanced Blending Options.

    Let’s start with the General Blending section.

    1. General Blending

    Blend Mode & Opacity

    General Blending includes two options: Blend Mode and Opacity

    These are the exact same options that you also find at the top of your Layers Panel

    A click on the Blend Mode dropdown will reveal the same 27 Photoshop Blend Modes on the Layers Panel and in the Layer Style Dialog Box

    And the opacity slider obviously is the same, too. 😆

    general blending options layers panel
    General Blending on the Layers Panel.

    In order to use these settings, you wouldn’t even have to go into the Layer Style Dialog Box. But I guess Photoshop wanted to offer a convenient way to also access these options once you’re in the Layer Style Dialog Box

    general blending options
    The General Blending options are also available on your Layers Panel.

    2. Advanced Blending

    Fill Opacity

    The first setting in the Advanced Blending section is Fill Opacity.

    Fill Opacity is available on your Layers Panel, too. There it’s simply referred to as Fill, but it’s exactly the same.

    The difference between Opacity and Fill Opacity is that Fill Opacity affects all the objects, text, and shapes on a layer, but it does not affect the opacity of any layer effects applied to them.

    Let’s say you have text on a layer and a Drop Shadow effect applied to it. Reducing Fill Opacity to 50% will make the text semi-transparent, while the Drop Shadow effect retains 100% of its opacity.

    If you reduce the Opacity to 50%, then both text and Drop Shadow will be semi-transparent.

    So Fill Opacity is an important setting to use with Layer Effects.

    fill opacity
    Fill Opacity affects objects, text, and shapes on a layer but NOT layer effects.

    Channels

    Below the Fill Opacity slider are the Channels check boxes. 

    Depending on what color mode you’re working in, there will be different check boxes.

    If you’re using RGB Color mode, there will be three check boxes for each color channel (R for Red, G for Green, and B for Blue).

    RGB channels
    Channels check boxes in RGB Color mode.

    When using CMYK Color mode you’ll have four Channels check boxes, which represent the Cyan (C), Magenta (M), Yellow (Y) and Black (K) channels of your image. 

    CMYK channels
    Channels check boxes in CMYK Color mode.

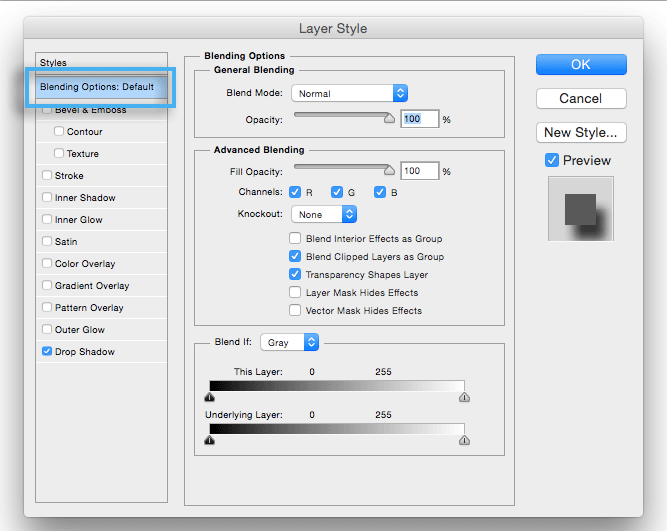
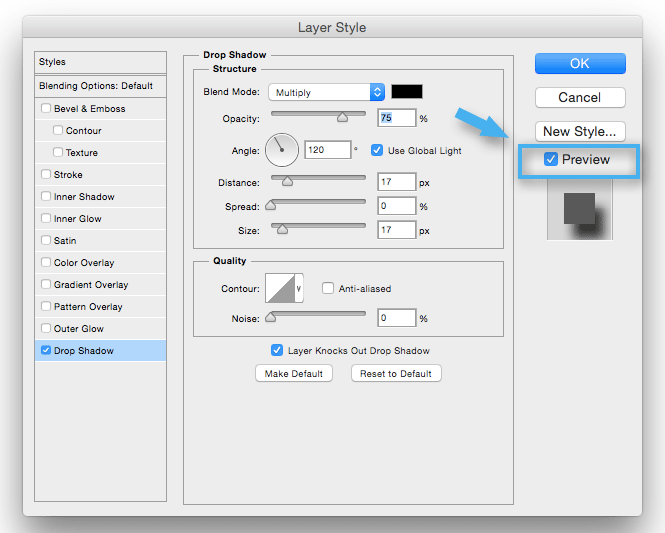
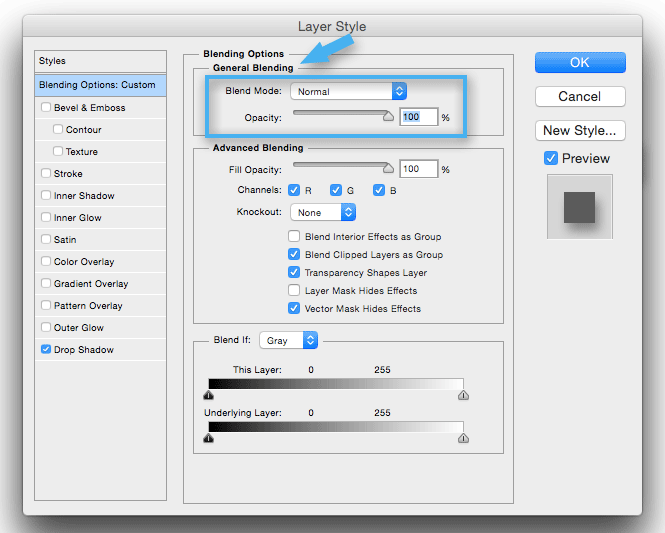
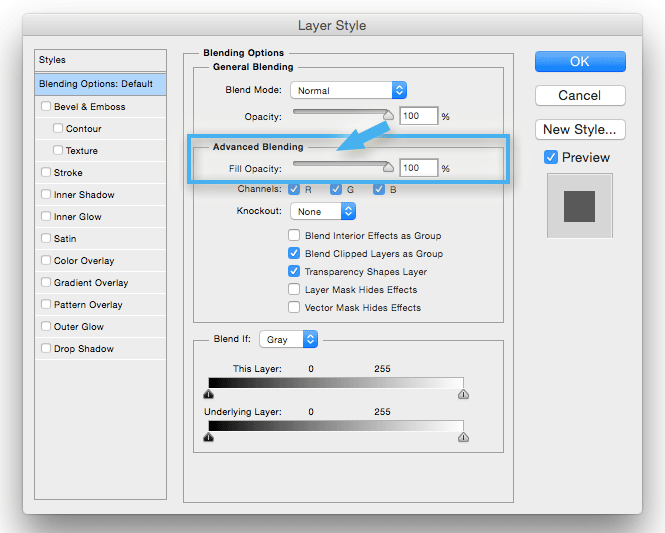
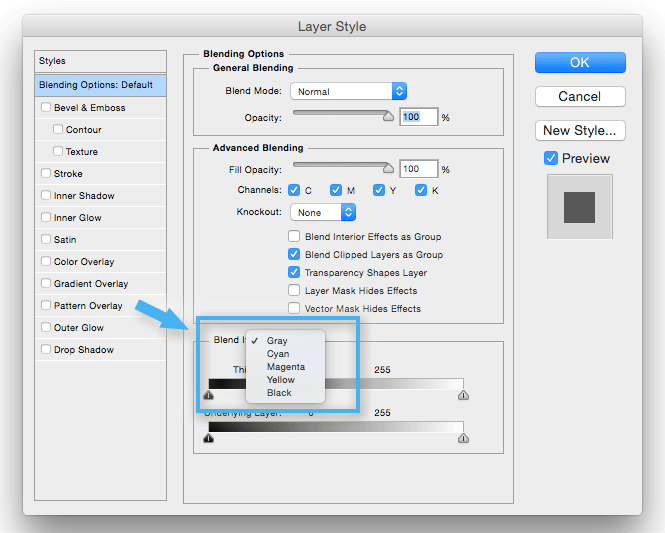
    Likewise, you’ll have three LAB Channels check boxes in LAB Color mode and no Channels check boxes in Grayscale mode, because grayscale doesn’t include color…

    In earlier versions of Photoshop, you could only turn off a channel for the entire image. With recent versions, however, you can modify the channels on a layer-by-layer basis.

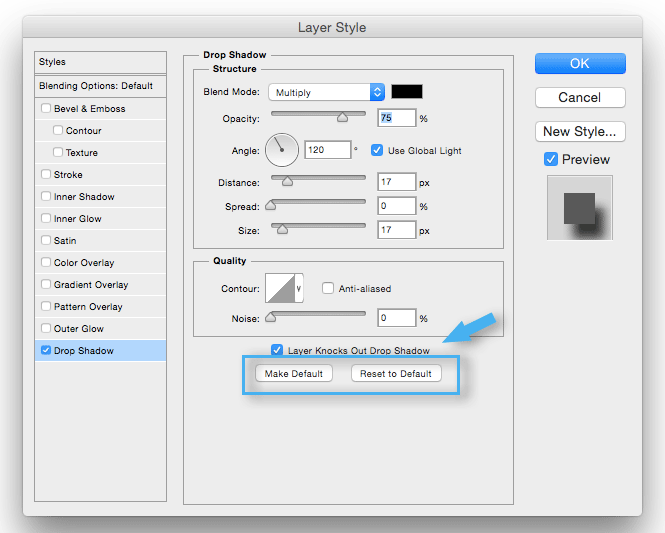
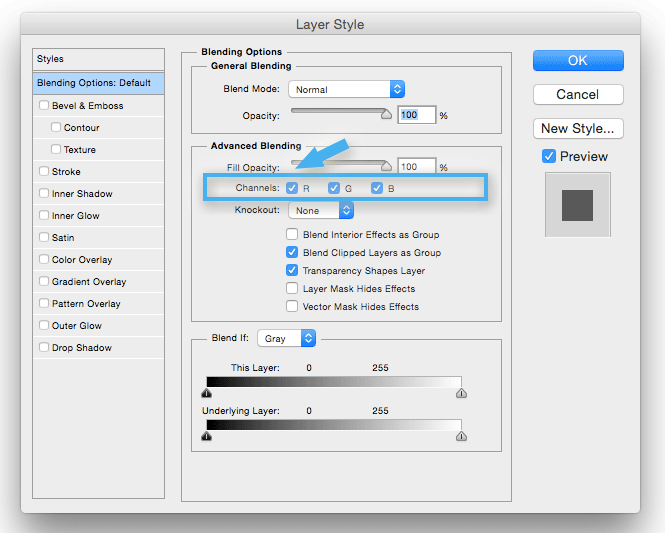
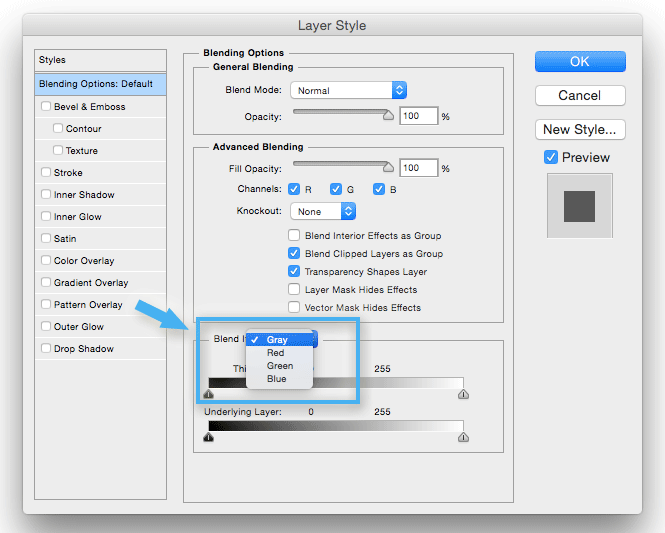
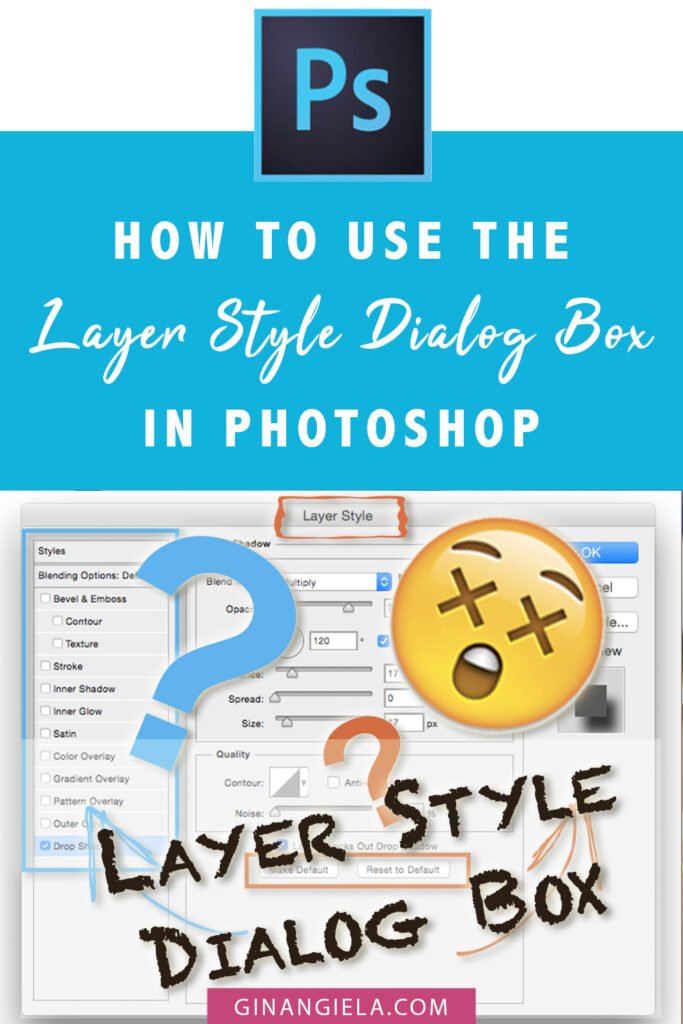
    The Channels check boxes on the Layer Style Dialog Box in Photoshop allow you to restrict the blending effects to a specific channel. By default, all channels are included.

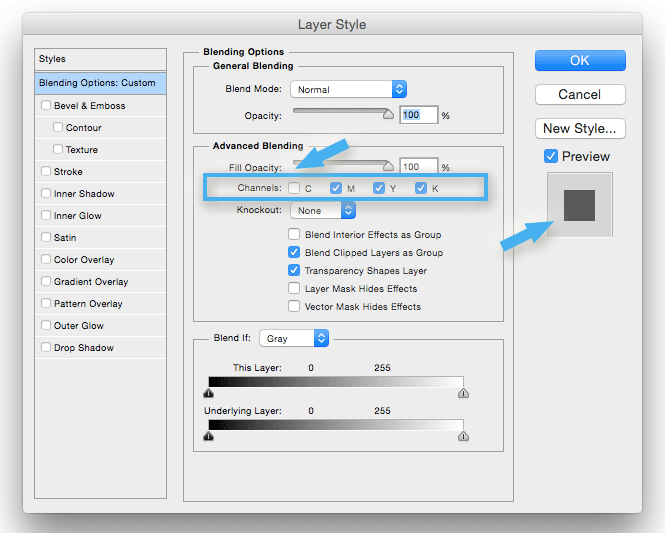
    Switching off one or more channels will give you different results depending on the colors used in your image.

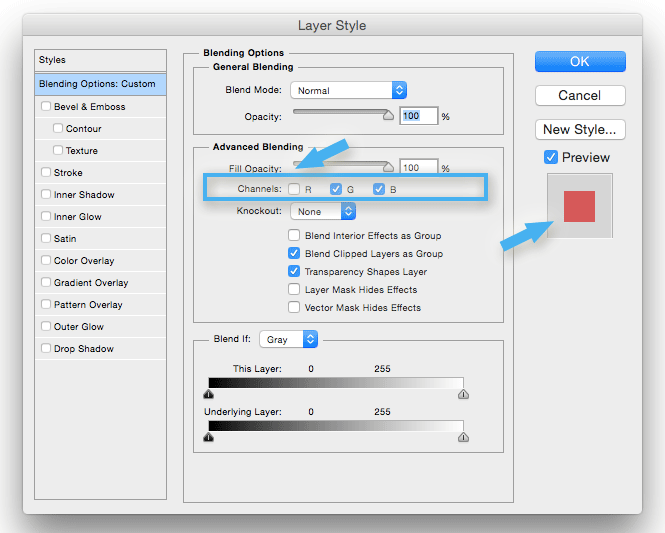
    For example, if you choose to exclude the Red channel in RGB Color mode, then only the information in the Green and Blue channels will be affected in the blending.

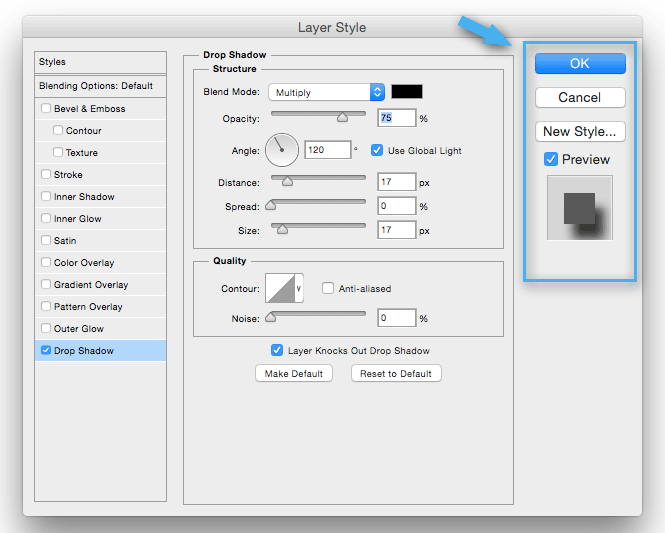
    Once you uncheck one or more Channels in RGB Color mode, Photoshop will indicate it in the preview thumbnail on the right-hand side. 

    If I switch off the Red channel, for instance, the preview thumbnail will take on a red color.  

    RGB channels Red channel off
    The preview thumbnail on the right indicates the changes you make to the RGB Channels.

    Knockout

    Let’s move on to the Knockout dropdown. 

    To achieve any effect with Knockout, either the layer’s Fill Opacity must be lower than 100% or its Blending Mode must be set to something other than Normal.

    There are three settings available in the Knockout dropdown: None, Shallow and Deep. None is the default setting and means that no knockout is applied to the layer.

    Shallow and Deep determine how much of the underlying layers shines through to the current layer. Shallow and Deep result in the same effect, unless the current layer is part of a layer group or a clipping group.

    If you use Shallow on a layer that is part of a group, then Shallow knocks out all the layers beneath down to the first layer outside the group.

    Deep, on the other hand, knocks out all the layers beneath down to the background layer, regardless of whether or not the current layer is part of a group. If you don’t have a background layer, it knocks out to transparency.

    knockout
    Knockout affects the transparency of the current layer in different ways.

    Group Blending Effects

    Below Knockout are five check boxes that affect the blending of layer groups and masks. The first two options affect the blending of grouped layers. 

    ‘Blend Interior Effects as Group’

    The first is ‘Blend Interior Effects as Group’, which is disabled by default. 

    When enabled, this option applies the blending mode of the layer to all the interior effects applied to this layer. Interior effects are Inner Glow, Inner Shadow, Satin, Color Overlay, Gradient Overlay, and Pattern.

    However, it does not mean that this option overwrites the blend modes that you selected for any of these interior effects. Rather, it changes the way these effects blend with the layers beneath, as the blend modes will be added together.

    group blending
    The five check boxes that affect the blending of layer groups and masks.
    ‘Blend Clipped Layers as Group’

    The second option only affects clipped layers. 

    A clipping group consists of a base layer and one or several layers clipped onto it using Photoshop’s ‘Create Clipping Mask’ option. This is to allow the mask of the base layer to define the overall shape of the group.

    ‘Blend Clipped Layers as Group’ is selected by default. That means the blending mode of the base layer in the clipping group affects all the other layers in the group. If the other layers have blend modes of their own, they are added together.

    Disable this option to make each layer preserve its own blend mode and appearance.

    ‘Transparency Shapes Layer’

    When enabled, Transparency Shapes Layer will apply layer effects and knockouts only to the opaque areas of the layer, meaning those areas that don’t include any transparency at all.

    This option is selected by default. When deselecting it, layer effects and knockout will be applied across the entire layer, regardless of transparency.

    ‘Layer Mask Hides Effects’

    This option is disabled by default. When enabled, adding a layer mask will primarily help you hide objects and effects on the layer, rather than shape them as usual. 

    ‘Vector Mask Hides Effects’

    This option is basically the same as above, only that it is used for layers that include vectors (text, shapes, paths, or pixels). 

    Blending Range

    ‘Blend If’

    The Blend If option is an easy way to blend layers together without making complex selections.

    It blends one layer into another based on the content of either of the two layers.

    When clicking on the dropdown, the first menu item you’ll see is the Gray channel. Depending on what Color mode you’re working in, you’ll also find Color channels.

    If you’re working in RGB Color mode, the dropdown will have a Red (R), Green (G), and Blue (B) channel.

    Layer Style Dialog Box Photoshop – Blend If RGB
    The Blend If option is an easy way to blend layers together without making complex selections.

    Likewise, if you’re using CMYK mode, you’ll have four color channels for Cyan, Magenta, Yellow, and Black (K). 

    The Gray channel is always the luminance channel. When selected, the adjustment you make using the sliders below are based on the lightness and darkness of either the current or the underlying layer.

    If you choose any of the color channels, you’ll be using that channel as the basis for your blending.

    When selecting the Blue channel, for example, it will be easy to knock out any part of your image that contain a blue color.

    To knock out more than one color, you can combine multiple channels.

    Layer Style Dialog Box Photoshop – Blend If CMYK
    In CMYK mode, you’ll have four color channels for Cyan, Magenta, Yellow, and Black (K).
    ‘This Layer’ and 'Underlying Layer' Sliders

    The last two sliders at the bottom set the blending range. This is a very powerful feature.

    The blending range controls the brightness of the blended pixels and is measured on a scale from 0 (black) to 255 (white). All in all, the upper slider determines how the pixels blend on the current layer, and the lower slider affects the blending of the pixels on the layer beneath.

    This gives you immense control over the blending of multiple layers. You can create unique blending effects by the mixing values of the active layer and the one below.

    There are two arrows beneath each slider. You can move these arrows as a whole, but you can also separate them into four individual arrows.

    Moving one of the white arrows as a whole to the left allows you to limit the brightness range of either the current or the layer below. Conversely, moving one of the black sliders to the right restrains the low value of the range.

    For example, if you drag the black slider of the active layer to a value of 24, pixels at a brightness lower than 24 on the current layer will not be blended.

    To separate an arrow, press and hold Option on a Mac (Alt on a PC), click on one half of the arrow and drag it away from its counterpart. Splitting the arrows will result in partially blended pixels and therefore smoother transitions.

    blending range layer style dialog box in photoshop
    The two sliders at the bottom set the blending range of the current and the underlying layer.

    ∗∗∗

    I hope that this tutorial helped you better understand the Layer Style Dialog Box in Photoshop. If you found any value in it, please feel free to share it with other artists so they can also learn from it!

    Make sure to sign up for my email list below so you don’t miss out on new Photoshop tutorials, perks for subscribers and other cool stuff. ♥

    Layer Style Dialog Box in Photoshop
    Layer Style Dialog Box in Photoshop
    Layer Style Dialog Box in Photoshop
    Layer Style Dialog Box in Photoshop
    Layer Style Dialog Box in Photoshop
    AngieG. – The Person behind the Pictures
    HI Y'ALL!  
    My name is Angie and I’m a self-taught digital artist. On this blog, I am sharing my experience and educational resources to help you develop your editing skills. My desire is to help you get to grips with Photoshop without needing expensive education or years of experience. To succeed, all you need is passion and the desire to learn!
    LET'S CONNECT:
    SHARE THIS POST:

    We ♥ comments and appreciate the time that readers spend to share ideas and give feedback. However, all comments are manually moderated and those deemed to be spam or solely promotional will be deleted.