How To Create A Surreal Portrait In Photoshop [Easy-To-Follow Tutorial]


GinAngieLa.com independently selects and reviews products & services. When you purchase through links on our site, we may earn a commission, at no extra cost to you. Learn more.

Surreal portrait photography is a powerful way of visual expression. In this tutorial, you’ll learn how to create a surreal portrait in Photoshop in 5 easy steps. All you need to do is take a conceptual portrait, follow the steps, and you’ll be able to create your own surrealism photography!

How To Create A Surreal Portrait In Photoshop
Don’t follow me‘ – a surreal portrait from my Headshots Collection.

Surrealism is one of the most influential art movements in contemporary art. It did not only influence the visual arts, but also many other spheres like literature, philosophy, and sculpture.

Photography has been a part of the movement since the development of the first camera. At the very beginning, surreal portraits used to be created with in-camera effects only (e.g. multiple or long exposures). Nowadays, with all the modern software programs and different hardware tools, it’s much easier than ever to make a photo look surreal. 

To create a surreal portrait in Photoshop, you'll need to follow these 5 easy steps:

    Add a header to begin generating the table of contents

    What is surrealism?

    What is actually the exact meaning of ‘surreal’? Well, one of the primary characteristics of surrealism is its irrationality. Surreal art is all about giving free rein to the subconscious and unlocking the power of your creative imagination.

    Digital surrealism, in particular, refers to all art created with the help of a computer and software.

    One subform of surrealism is popsurrealism, also known as lowbrow art.

    Related: What Is The Difference Between Lowbrow And Highbrow?

    What all surreal works have in common, though, is the somehow strange and bizarre depiction of reality. A surreal photo is not intended to be realistic and rational. It typically contains fantastic and nonsensical elements.

    Surrealism doesn’t follow any rules. It can make people feel uncomfortable or wonder about the meaning behind the artwork.

    How to create a surreal portrait in Photoshop

    In this Adobe Photoshop tutorial, I’m showing you step-by-step how to create a surreal portrait. First of all, we’ll be creating a conceptual portrait and then edit it with a couple of Black & White Adjustment Layers and some little extras here and there to give it that typically bizarre and dramatic look. 

    This surreal Photoshop tutorial is really easy to follow and provides you with a good baseline to create your own surreal portraits. I am going to walk you through all the editing steps that I used to create ‘Don’t follow me‘ from my Headshots Collection

    So let’s get started. 

    STEP 1: Work out a concept and take a portrait

    First off, you’ll need to work out a concept for your surreal portrait. You can quickly sketch it down on a piece of paper, or simply create an image in your mind. That is what I use to do. 

    For the surreal portrait that I had in mind, I wanted to create a sort of scared and haunted expression. 

    You don’t need to have your own studio or super-sophisticated equipment to create surreal portrait photography. It surely helps, but a simple room with a bright window often does the job as well. 

    Surreal portrait photography
    First off, you'll need to work out a concept for your surreal portrait. You don't need to have your own studio, a simple room with a bright window is often enough to shoot surreal photography.
    STEP 2: Crop the portrait, if necessary

    Depending on how your shot came out of the camera, you can still crop it to make it look – let’s say – more dramatic or more intense. 

    Open your photo in Photoshop by going to File > Open and selecting the image from your hard disk. 

    If you are not yet sure how (or whether) to crop it, you can simply play around with the Crop Tool to see how things turn out. 

    I for my part cropped away most of the background and even part of the head. That really shifted the focus on the scared-looking eye and the rest of the face that immediately grab the viewer’s attention. 

    Crop the portrait
    You can crop the photo to make it look more dramatic and intense. 
    STEP 3: Add one or more Black & White adjustment layers

    Black & White often gives a more emotional feel to images. That’s why I decided to turn my shot into a monochrome piece.

    First off, I added a regular Black & White Adjustment Layer. (Go to Image > Adjustments > Black & White in the top menu bar, or click on the ‘Create new fill or adjustment layer icon’ at the bottom of your Layers Panel.) I played around with the sliders until I achieved an overall dark and somber look.

    Depending on what effect you want to create for your surreal portrait, adjust the sliders accordingly or choose one of the Black & White presets from the dropdown.

    Black and white surreal portrait
    I added a Black & White Adjustment Layer and played around with the sliders.

    I also added a slight tint along with the Black & White Adjustment Layer. If you wish to do the same, simply click on Tint in the Properties panel and select the tone you want to use. In my case, it was a dark-reddish tone (adjust the Opacity as needed).

    Subtle highlights can increase the expressiveness of your surreal portrait photography.

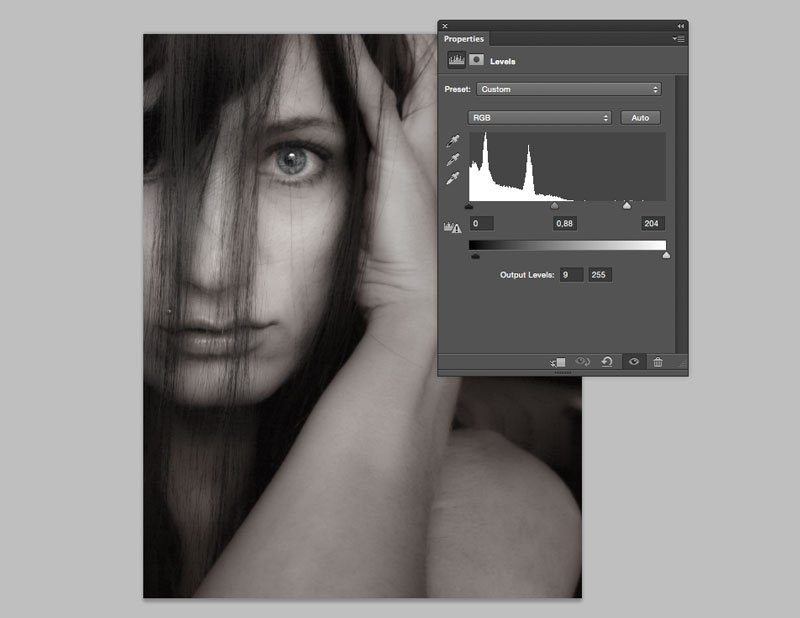
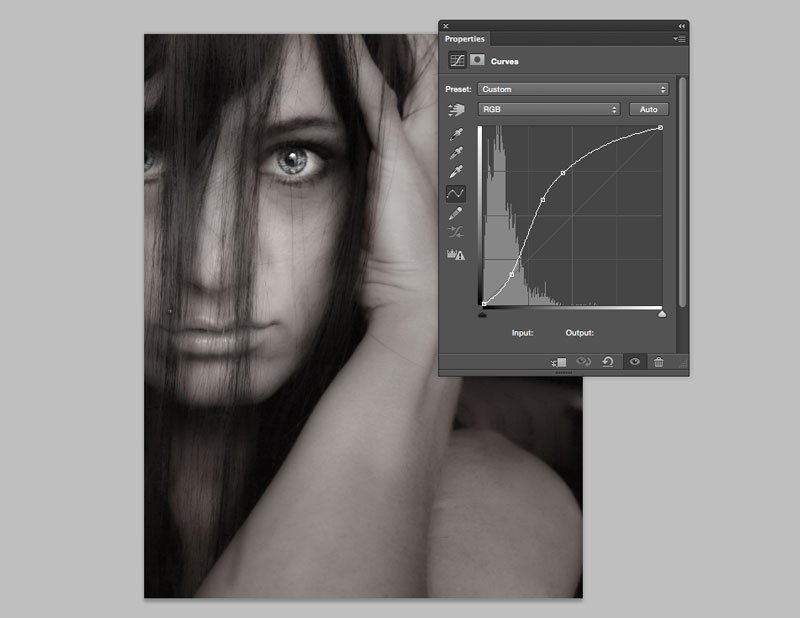
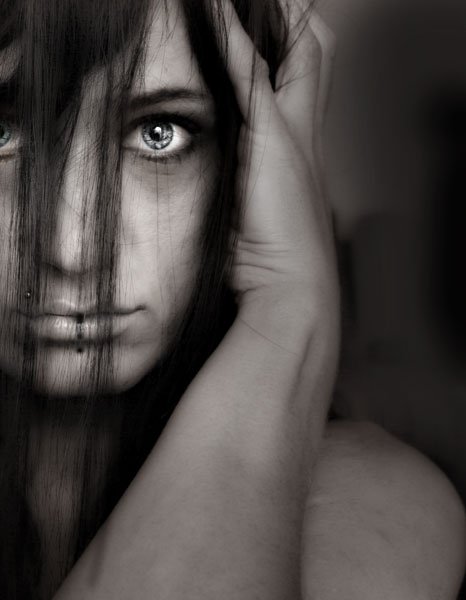
    That’s why I chose to add some highlights to make certain areas pop, in particular the area around the eye and a bit of the hand.

    To do so, I added a Levels Adjustment Layer, decreased the blacks a bit by moving the black Output Levels slider at the very bottom slightly to the right. After that, I went ahead and adjusted the gray and white RGB sliders in the middle of the panel by moving both slightly down to the left.

    Since I didn’t want to have the highlights on the entire portrait, I inverted the mask of the adjustment layer. You can invert a mask by selecting it on the Layers Panel and then pressing CMD + I on a Mac or CTRL + I on a PC. Alternatively, you can go to Image > Adjustments > Invert in the top menu bar.

    Once you have inverted the mask and hidden the effect, you can choose a soft white brush, lower Opacity and Flow, and start painting on the black mask of the Levels Adjustment Layer. This allows you to bring back the highlights exactly where you want to have them on your portrait!

    Surrealism photography
    Subtle highlights can increase the expressiveness of your surreal portrait photography.
    STEP 4: Work out the eyes to make the photo more dramatic

    The eyes are always the most expressive element in every portrait. That's why I suggest you focus on the eyes when you create a surreal portrait in Photoshop. 

    There are different ways to make the eyes stand out. For example, you can sharpen the pupil (or the entire eye) by selecting it with the Lasso tool and then applying a sharpening filter. (Go to Filter > Sharpen, and select the Unsharp Mask filter.)

    What I like to do is highlight the pupils and a bit of the surrounding eye area. This time, I used a Curves Adjustment Layer. To make the effect apply to the desired part only, you can select the area with the Lasso tool. With the selection active, add a Curves Adjustment Layer. The selected area will automatically be white on the mask (while everything not selected will be black).

    That means you can now tweak the curve as needed and see the effect being applied to the selected area only.

    As you can see in the sample below, I dragged two control points up to increase the whites, while dragging one control point down to preserve the blacks. Dragging a control point up or down lightens or darkens the tonal area of the image. Dragging a control point left or right increases or decreases the contrast. To remove a point, drag it off the graph.

    Work out the eyes to make the photo more dramatic.
    There are different ways to make the eyes stand out. I used a Curves Adjustment Layer.

    If the initial selection that you made with the Lasso tool turns out to be too sharp, you can smoothen the edges with Gaussian Blur (Filter > Blur > Gaussian Blur) or increase the Feather radius of the mask in the Properties panel.

    To get to the Properties panel, just click on the icon with the dark circle in the top left corner, right before the word ‘Curves’ on the Curves panel. Then move up the Feather slider.

    STEP 5: Cut out or fill in any parts not needed

    If you are not shooting in a professional studio just like me, chances are there will be some things in the background that you don’t need in your final portrait.

    You can either cut out these parts and replace them with something else (like a background texture), or paint them over like I did in the example.

    If you find it hard to cut out elements quickly, I have a great Photoshop tutorial showing you an Easy 3-Step Process To Cut Out Things that you can also use for photo manipulations.  

    As for my ‘Don’t follow me‘ surreal portrait, I simply painted over the background with a soft black brush. I also covered parts of the hand and the shoulder so the entire image got a really nice, dark feel. 

    Cut out or fill in any parts not needed
    I painted over the background with a soft black brush, also covering parts of the hand and the shoulder.

    Here we go. This is the final result of my surreal portrait. I’m pretty happy with the result. I like the overall dark and haunting look with the highlighted eye that captures the viewer’s attention… 

    I hope you enjoyed this tutorial on how to create a surreal portrait in Photoshop and got inspired to create you own surreal photography! 

    Don’t follow me‘ – the final surreal portrait after post-production in Photoshop.
    Display example. If you wish to get a print or purchase the HR file, you can look here. 🙂

    9 Best techniques: How to create surreal photography in-camera and through post-production

    For more techniques on how to create surreal photography with both your camera and through post-production in Photoshop, check out the post below! 👇

    ∗∗∗

    I hope that this tutorial on how to create a surreal portrait in Photoshop was helpful. If you found any value in it, please feel free to share it with other artists so they can also learn from it!

    If you are using anything of what I’ve showed you in this post, don’t forget to tag me on Instagram @ginangiela, or post a link here in the comments. I’d love to see your creations! Make sure to sign up for my email list below so you don’t miss out on new Photoshop tutorials, perks for subscribers and other cool stuff. ♥

    create a surreal portrait in photoshop
    create a surreal portrait in photoshop
    create a surreal portrait in photoshop
    AngieG. – The Person behind the Pictures
    HI Y'ALL!  
    My name is Angie and I’m a self-taught digital artist. On this blog, I am sharing my experience and educational resources to help you develop your editing skills. My desire is to help you get to grips with Photoshop without needing expensive education or years of experience. To succeed, all you need is passion and the desire to learn!
    LET'S CONNECT:
    SHARE THIS POST:

    We ♥ comments and appreciate the time that readers spend to share ideas and give feedback. However, all comments are manually moderated and those deemed to be spam or solely promotional will be deleted.