How To Update WordPress Manually On Localhost [Step-By-Step Tutorial]

  • Post category:WordPress
  • Post last modified:January 14, 2024

GinAngieLa.com independently selects and reviews products & services. When you purchase through links on our site, we may earn a commission, at no extra cost to you. Learn more.

Working with an offline WordPress site on your local hard disk, or localhost, is a great way to build your page without sending it live yet. However, there’s no WordPress one-click update option available offline. That’s why you need to update WordPress files and database manually. This tutorial shows you how to update WordPress manually on localhost – step-by-step and easy to understand.

How to update WordPress manually on localhost

How do I update WordPress offline?

If you’ve been into WordPress for a while, you probably know that working on an offline WordPress site is a great way to develop a website without making it live yet.

This gives you the opportunity to freely try things out. You can play with the design, learn to work with a page builderwrite and rewrite content, create portfolio galleries for your art, and so on. You don’t need to worry about people seeing your unfinished site, and you don’t need to pay for hosting.

Still, you want to make sure to use the latest WordPress version to keep your site up-to-date and enjoy all the features that come with the most recent upgrade.

WordPress rolls out updates on a regular basis that include advanced functionalities and bug fixes. The most recent major WordPress update in 2020, for example, brought out a whole range of improvements. These include new post format categories, the option to publish posts via email, automatic update services notifications, comment filtering, and many more.

Plus, the latest versions of some plugins only work with the latest version of WordPress…

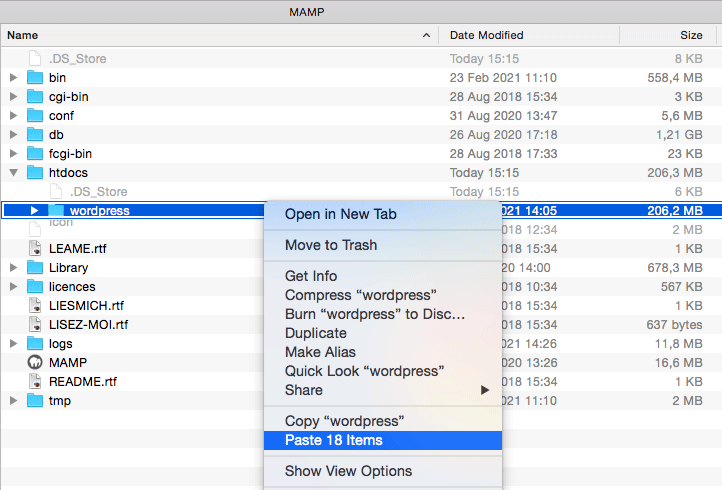
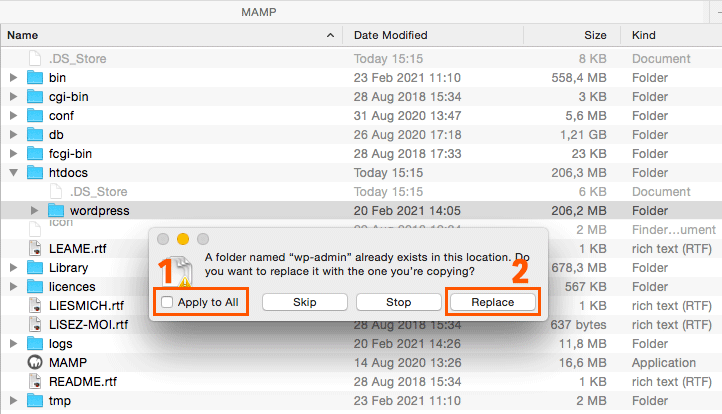
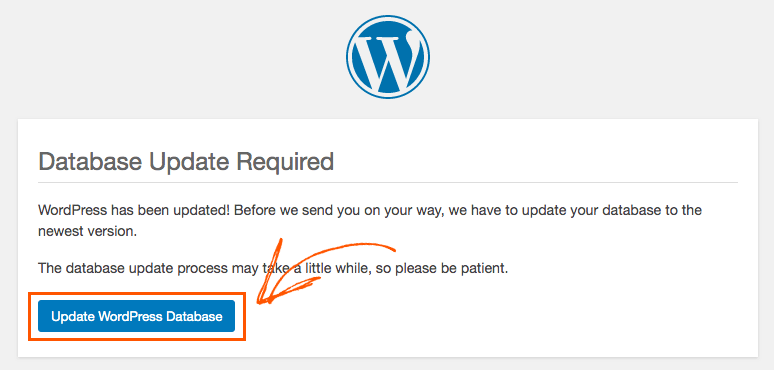
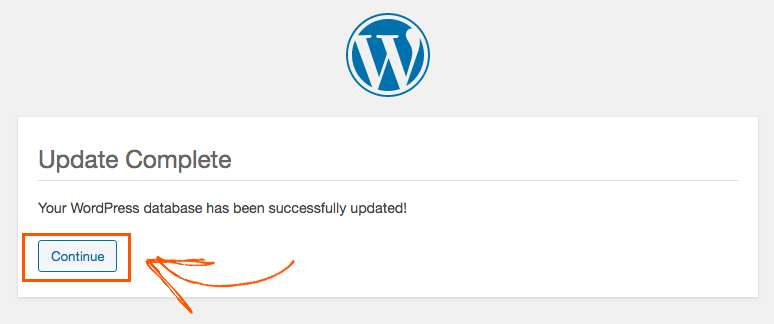
That’s why it’s important to update WordPress offline manually.

Related: → Learn everything about building your own artist website. 

how do I force WordPress to update offline?

Updating WordPress offline is not the same as updating your WordPress install on a live server. Once your website has gone online, all you need to do is press one button to get the latest WordPress update. 

As long as you have your website on your local disk, however, you cannot force WordPress to update offline. There’s no WordPress one-click update option available offline. 

To still be able to use the latest WordPress upgrade with your site on localhost, you need to update WordPress manually. 

So, stay tuned! In this tutorial, you’ll learn step-by-step how to update WordPress manually on localhost. 

To update WordPress manually on localhost, these are the four steps you'll need to follow:

    Add a header to begin generating the table of contents

    Step-by-Step WordPress Tutorial

    How update WordPress manually on localhost

    STEP 1: Download the latest WordPress version

    Step #1 of this WordPress tutorial is quick and easy.

    First off, you need to download the latest WordPress version from WordPress.org.

    If you haven’t backed up your local WordPress install yet, it’s time to do that now. I highly recommend making a complete backup, including database and media files. If anything goes wrong, you can easily recover your previous WordPress site from the backup.

    A great backup plugin that allows you to back up your WordPress database and media files is WPVivid Backup.

    STEP 2: Unzip the installation folder

    The WordPress download comes in a zip archive. Unzip that archive by double-clicking on it or using any unzip tool, like WinRAR, WinZIP, or RAR Extractor, depending on your operating system. 

    Once you’ve unzipped the download folder, you’ll see a folder named ‘wordpress’. This folder contains the latest version of WordPress. 

    Another double-click on that folder will open it, and the files and subfolders in it will look something like this: 

    WordPress download
    These are the files and folders in the unzipped archive of the WordPress download.
    STEP 3: Delete The 'wp-content' Subfolder

    Let’s move on the third step of this tutorial on how to update WordPress manually on localhost. 

    All you need to do here is delete the ‘wp-content’ subfolder from the main WordPress installation folder.

    Third step of this tutorial on how to update WordPress manually on localhost
    Deleting the 'wp-content' folder is necessary to not overwrite your existing website content.

    But why on earth are we deleting a folder from the WordPress download?

    If you open the ‘wp-content’ subfolder, you’ll see that it contains the default themes (twentynineteen, twentytwenty, …) and the default plugin (Akismet) WordPress comes with.

    Once you upload images, videos, and other files to your website, they will also appear in the content folder.

    The 'wp-content' folder contains your installed theme, plugins, and content uploads.
    The 'wp-content' folder contains your installed theme, plugins, and content uploads.

    You’ve already installed your favorite theme and the plugins you need on your offline WordPress site on localhost. Likewise, you’ve already uploaded the images and all other media that you’re using on your website.

    As we don’t want your theme, plugins, and media files to get overwritten and lost, we need to delete the ‘wp-content’ folder. 

    Don’t worry, deleting the folder won’t do any harm and impact the WordPress installation. All important WordPress files and folders will be updated. 

    STEP 4: Copy & paste all files and folders into your current WP install

    With the ‘wp-content’ subfolder deleted, you now need to select all remaining files and subfolders in the directory and copy them. 

    Update files in WordPress
    These are the files you want to update in WordPress.

    Note: In the example above, I don’t select the ‘.DS_Store’ file. This file only indicates that potential hidden files are being shown on your Mac. So if you have that file in your directory as well, don’t select it. J

    With the files and subfolders copied, locate the directory of your current WordPress install on your local hard disk. 

    The WordPress install is always in the ‘htdocs’ folder of the server software program that you’re using. If you have a Mac, this might be MAMP or XAMPP. On a Windows PC, it might be Apache HTTP or WampServer. 

    So, how to update WordPress in XAMPP, MAMP, WAMP... ?

    Well, the process is always the same. You need to open your Applications directory and go to your server program folder in there. 

    In my case, I locate the ‘htdocs’ folder within my MAMP directory. In the ‘htdocs’ folder, I can see my current WordPress install, which is also named ‘wordpress’.

    If you’re working with multiple local WordPress installs on your computer, there will be folders with different names.

    Choose the folder with the WordPress site you want to upgrade. Right-click on the folder and select ‘Paste Items‘ from the pop-up menu.

    WordPress upgrade site
    Choose the folder of the WordPress site you want to upgrade and paste the items into it.

    When the confirmation prompt appears on the screen, select ‘Apply to All‘ and ‘Replace‘. This will overwrite your old WordPress install with the new version. 

    You've just learned how to update WordPress manually on localhost
    Confirm to replace all existing files with the latest WordPress update.

    And that was already it. Congratulations, you’ve just learned how to update WordPress manually on localhost!

    When you now check back to your updated WordPress folder on localhost, you’ll see that your original ‘wp-content’ folder with your installed theme, plugins, uploads, and whatever else you are using, is still there. 

    Updated WordPress install
    Your existing content (themes, plugins, media uploads, etc.) did not get affected by the manual WordPress update.

    How do I manually update my WordPress database?

    Before continuing to work on your WordPress site, you first of all need to update your WordPress database as well. The ‘Database Update Required’ prompt will appear as soon as log back into your dashboard. 

    Simply click on the button to manually update your WordPress database. 

    Usually, the process is really fast. If you have a huge database, it can take a few seconds. 

    How do I manually update my WordPress database?

    Once the database update is complete, just hit the ‘Continue‘ button and you can go on working on your local WordPress website. 

    Your WordPress database has been successfully updated!
    Your WordPress database has been successfully updated and you can continue working on your WordPress site offline!
    Do you like this website? You can have one similar to mine!

    I am building my website on WordPress using the OceanWP theme & Elementor page builder and hosting it on Hostinger!


    Here I show you how to create an artist website with WordPress in 5 easy steps.

    I hope you enjoyed this little tutorial on how to update WordPress manually on localhost and were able to learn something from it. If so, please drop me a comment and share it with other WordPress users! Catch you in the next post, Angie 🙋

    How to update WordPress manually on localhost
    How to update WordPress manually on localhost
    How to update WordPress manually on localhost
    How to update WordPress manually on localhost
    AngieG. – The Person behind the Pictures
    HI Y'ALL!  
    My name is Angie and I’m a self-taught digital artist. On this blog, I am sharing my knowledge and educational resources to help you build a website for your art. My desire is to show you that you don’t need to be a coder to create a website. All you need is the desire to learn and the get-up-and-go to get started!
    LET'S CONNECT:
    SHARE THIS POST:

    We ♥ comments and appreciate the time that readers spend to share ideas and give feedback. However, all comments are manually moderated and those deemed to be spam or solely promotional will be deleted.